Interested in becoming a NO Days Featured Artist?

Interested in becoming a NO Days Featured Artist?


Want to share your artwork made using NO Days products with the world? We want to help you promote your work! We love seeing the various ways artists are using NO Days products! We share our Featured Artist spotlight with our newsletter subscribers, our Facebook friends and fans, on our Featured Artist Page and right here on our blog, linking back to your website.

Simply send an email to info@nodaysadhesives.com with the subject: Featured Artist. Be sure to include your name, email address, and website (if you have one) along with a brief bio and pictures of yourself and your artwork made with NO Days Products. Not sure what to include in a bio? Tell us how you became interested in playing with glass or crafts. How about where you get your inspiration? Oh! And don't forget to tell us why you love using NO Days!
Showing posts with label NO Days Liquid Fusing Adhesive. Show all posts

Wednesday, June 22, 2016

No Days Liquid Fusing Adhesive - clean up

Hi:
what is the best way to clean a brush after using it to apply No Days Liquid Fusing Adhesive?
Thank you,
R

No Days Liquid Fusing Adhesive is the BEST fusing adhesive!


Hello, R ~

When I'm using a brush with No Days Liquid Fusing Adhesive, I'll generally have a paper towel next to me while working. I use it occasionally to wick some of the adhesive off of the brush (and little bits of frit when I get build up).

When I'm finished working, I'll just wipe the brush off on the paper towel by "painting" excess adhesive onto the paper towel. Then, I just let it dry. I generally dedicate this brush (actually, I have two dedicated brushes) to working with No Days. It will harden up, but when I use it on the next project, the brush will get saturated again and soften up.

However, if you don't want to dedicate a brush for working with No Days, then you can clean it up when you're done with a bit of oil. Any oil you've got lying around will work. I generally use canola oil, or cutting oil, because they're right there. Place the oil in a cap, small container, jar lid, etc. and paint the brush around in it. After getting it thoroughly saturated, put a bit of dish soap in the palm of your hand and swish the brush around in it. Rinse and then, VOILA! Clean and ready to use on something else!

Alternatively, you can use acetone (or acetone based fingernail polish remover). Just place a bit of the acetone in a jar and soak and clean the bristles in the acetone. But, I prefer the oil and soap method.

Hope this helps! If you have more questions or this didn't fully answer your question, feel free to contact me again!
Good luck!


Carrie

Wednesday, August 20, 2014

Artist Spotlight ~ Jackie Doehling of Full Moon Loon Designs

Meet Jackie Doehling of Full Moon Loon Designs!
Full Moon Loon Designs is my artist name & the Doing Business As (DBA) name I chose when I decided I might want to pursue this as a little more than a casual hobby. Why “Full Moon Loon?” The loon is our state bird here in Minnesota, and the full moon – well, that seems to be when I feel the most creative. Sometimes I am just bursting with creative energy around the time of the full moon, and in fact there was a full moon when I came up with the name.
No Days featured artist Jackie Doehling of Full Moon Loon Designs

I still consider myself a beginner in this wonderful world of glass as there are so many techniques and methods I have yet to try. I was introduced to glass fusing in a small workshop type get-together a friend of mine had at a local studio. We made pendants out of scrap glass and that was all it took, I was HOOKED! Back in 2010 I bought a microwave kiln and it was a fun way to get started with small pendants and pieces, but I knew I wanted to do more. I bought my first “real” kiln in early 2011 and added a second one a year later. One of my favorite methods in glass design is using stencils and powders. Powders and frits allow you limitless possibilities when it comes to design. You can follow a pattern or create something completely random and unplanned (sometimes those are the best projects!)
Jackie joined Shannon's Stained Glassery for a No Days Road Show
and classes on frit painting

For the past two years I have entered pieces into the Minnesota State Fair and on both occasions I won a third-place ribbon. This year I am entering a piece where I used a method I learned in a No Days Road Show, frit painting. The top layer is a pair of Lady’s Slipper flowers (Minnesota state flower), the second layer is our state bird, the loon, and the base layer is a piece of blue swirled glass representing the “Land of 10,000 lakes.” Each layer is actually a design layer plus a layer of thin clear fused together, so in the final firing it was six layers of sheet glass plus frit. I call it “Minnesota in Glass” and while it didn’t make it past the first round of the juried fine arts competition, I am not giving up! Instead I am entering it into the Creative Activities which is where I have entered the past two years. Perhaps the third time’s the charm?

Jackie's tribute to Minnesota, a frit painted piece
using No Days Liquid Fusing Adhesive

I love the No Days Liquid Fusing Adhesive as it works great for not only the frit painting process, but also for holding things in place before firing. It always burns off clean and has never left any marks or residue on my glass. My first experience with a No Days product was the ThinFuse Adhesive. It works great for building designs with several pieces of glass like a quilt pattern or mosaic design. I also like the BailBond adhesive for attaching bails to pendants, it works like a charm (no pun intended!)
I love the No Days Liquid Fusing Adhesive as it works great
for not only the frit painting process, but also for holding
things in place before firing. It always burns off clean and has never left
any marks or residue on my glass.

While glass is my true passion, I am employed full time in IT as a business analyst. I earned my Master of Science in 2012 in Technical Communication and my Bachelor of Science (2006) is in Management Information Systems. While I’ve never taken any art classes while working on my degrees, I do pursue local workshops and classes from time to time and wouldn’t mind teaching at some point. I keep hoping to win the lottery so I can retire and play with glass full-time! So far, I haven’t sold in any shows but I am getting my website up and running and hope to have my store page live this year. You would think being an IT type, the site would be a no-brainer, but if it’s a choice between working on glass and working on a site about glass, well you can guess where I am likely to spend my time!

Full Moon Loon Designs ~ Jackie Doehling

Jackie Doehling
Owner & Artist, Full Moon Loon Designs
July 2014

Friday, November 29, 2013

Oops! Now what?!? Working with frit and No Days Liquid Fusing Adhesive

"Embroidered Dogwood" fused glass plate created with frit,
Glassline paints and No Days Liquid Fusing Adhesive.
The creation of this plate is an epic tale. So grab your preferred beverage, sit back and enjoy the ride!

Clear fusible glass base with painted trace lines done with
Glassline paints.

In the beginning, there was a circle of clear glass and some glassline paints to outline the design...I've been working on a series of floral themed platters. Some of them are very realistic looking, but mostly, I lean towards abstract and lots of color. My aim for this particular plate was to make it look geometric with a sense of needlework. After tracing the outlines of my design from a template to the clear glass base and letting the paints dry (10-15 minutes), I was ready to add details and color with various frits.

Building frit design from the center outward over the
dried paints. Frit is held firmly in place with
No Days Liquid Fusing Adhesive.
When I'm using frits, the size grain that I use depends upon the outcome I'm going for. When adding fine detail lines, I use fine frit (size F2 in System 96 or size 01 in Bullseye). The fine frit allows me to create highly detailed imagery. It is also easy to sculpt with the No Days Liquid Fusing Adhesive. If I have larger areas of my design to fill in, I'll switch to medium or coarse frit sizes and often blend colors, as well as mixing opals with cathedrals. Once I've got my design established, I find a good starting point in the center-ish. This makes it easier to work on your piece without brushing your arms across your design.

Detailed frit designs are added in a circular motion building outward.
I lay down a bit of No Days Liquid Fusing Adhesive, then cover it with frits. I sculpt the frits into the shape I want them to be. It's easiest to work from the inside out (in this case).  By starting in one spot and then working next to it, you've got a wall of frit to support each new addition. I decided to experiment with adding some coarse frit accents in areas (to mimic the knotted stitches in embroidery), and then covering them with fine frit. Here, we're viewing the plate from what will be the front side when the plate is finished. It's helpful to have a mirror to work on, then you can see what the front side of the plate looks like as you're working without having to lift the plate overhead.

Checking the progress, looking up at the underside.
If you build on a mirror, you can check your progress as you work.
Although there are no trace lines outside of the flower in the center, I wanted to continue building in a pattern around the edges. Each new color got placed and sculpted until I reached the edge...

The design is nearly finished! And then...
Super close to being finished, and can you believe that it still hasn't occurred to me that I'm working with "enemies"? Wait, what?!?

A picture of the finished frit design before firing in the kiln to
burn off the adhesive and save my design...hopefully.
Yea! It's all finished, and about this time I realize that I've used a piece of 90 COE clear base with 96 COE frits. This is one of those projects that sat in my studio for a few months after being painted before I was able to get to it and add frits. A great lesson in keeping an extremely well organized studio if you plan on firing glass in the kiln. Either stick with one kind of compatible glass, or segregate your pieces from step one! 
So, now I'm left with a beautiful mosaic platter. I could have left it glued together as a flat piece and the No Days Liquid Fusing Adhesive would keep it glued together for good. But, that's not the intention I had when creating this plate, so it's time to trouble shoot. And, admittedly, that's one of the great pulls that fused glass holds over me. I love problem solving and understanding the whys behind the process. So, time to experiment...

First attempt to burn off the adhesive...obviously failed.
Getting to know No Days... The picture above shows the results of my poor plate going into the kiln after the first attempt at burning off the adhesive. 

The firing schedule follows:
300ºF per hour600ºF1.30
off

NOTE: All following firing schedules will have the above layout, with the first column being degrees per hour (in ºF), the second column is the target temperature in ºF, and the third column is the hold time: hours.minutes).

Obviously the adhesive did not fully burn out. The frit is still stuck firmly to the plate and has not dropped to the kiln shelf. Looks "carmelized." Yum.

Detail of caramelized glass...Frit is still stuck in place!

Okay...so the adhesive really holds! Let's see what a second burnout attempt looks like...

Second burnout attempt.

I left the kiln vented for the entire firing so I could observe what was happening. [Also, my studio is in the garage next to a window that I can open for ventilation. I always recommend trying to keep your kiln in a space that is not a living space. That way anything that burns out while firing (binders, adhesives, fiber papers, etc.) will not stink up your house.]

At 800ºF, there was visible smoking.

At 920ºF, there is no visible smoke, but I could smell the adhesive burning off and see brown on the kiln shelf.

After 45 minutes at hold temp (1000ºF), I could no longer see any carbon burnout on the piece or kiln shelf. The frit has not dropped from the glass to the shelf.
  
After the firing was complete, the adhesive in the center of the plate had obviously not burned off. The frit on the edges of the plate can be tapped off of the glass. (This makes me want to do another experiment to see how well the frit holds on to the plate after burning off the adhesive...that's for another post...)

[NOTE: The plate is placed directly on a kiln-washed shelf with no fire paper. The clear glass on top of all the frit is preventing the adhesive from burning out in the center. It would be much quicker to burn off the adhesive if the glass base were on the bottom and the frit on top. However, I need to get the adhesive to burn out and release my frit onto the kiln shelf, so I can replace the clear glass with compatible System 96 glass! This means that it's taking longer for me to burn out the adhesive than it would under normal circumstances (frit on top of sheet glass in the kiln).]

Second attempt firing schedule:
300ºF per hour1000ºF1.30
off


The adhesive has fully burned off after 4.5 hours in the kiln and
three successive low temperature firings.
At this point, I decided to try the second firing schedule again. Why? Well, I don't want to raise my top temperature any further. If I creep up towards 1100ºF, my glass base will start to distort and slump into the frit, and my hope is to salvage that piece to create a different dogwood plate. I figured that another long hold at 1000ºF will help to get that adhesive out from under the glass in the center of the plate. Guess what?!?  After the third burnout attempt, SUCCESS! Full burnout of adhesive. The frit is still stuck to the plate in places, but can be tapped off, mostly.

Third attempt at burnout firing schedule:

300ºF per hour1000ºF1.30
off


The frit that has been tapped off of the clear glass and salvaged on the kiln shelf.

The frit design has been saved on my shelf so I can now prep a clear piece of System 96 glass to cap it with!
This is the frit that was still hanging on the clear piece of glass!
Can you believe the adhesive is still working after all of that?!?
I wasn't able to tap off all of the frit. The adhesive has fully burnt out, but the frit is still sticking together. It did come off of the plate when I wiped it clean, but I just trashed the bits that didn't transfer to the shelf. Below, you can see where I added additional frit to the design to fill in the gaps (aiming for the magical 6mm thickness that glass wants to be at a full fuse).

Take two...(or is it four?)...I've added a clear sheet of Spectrum to
cap the frit that was left on my kiln shelf.


I prepped another sheet of glass, this time using the proper glass: Spectrum clear with Glassline paints.
Full fuse number one...success-ish!
After a full fuse, the plate has a few divots (not to be confused with devit = devitrification; because there's none of that), plus I want to add more depth.

Time to add more depth and detail to the top side of this design
with coarse frits and a No Days Powder Wafer.
Plus, clear frit to even out the thickness of the glass.
There are areas where the thickness of the glass wasn't 1/4," so I added some clear frit to fill in the divots. Also, I wanted more of those embroidery "French knot stitches" and added bits of coarse frit for detail. Then, because the middle was still lacking, I decided to add a No Days Powder Wafer. Uh...what's that? It's still a secret! But, watch for details in the next few months. Oh! And you can sign up for Jacqui Bush's Vegas class to get a jump start on the technique, too!

I'm on a roll! Time to get these projects fired and finished!
For the finishing full fuse, I loaded the kiln with two other projects I've been waiting to fire.
The plate on the lower left is ready for it's first firing. It was also built entirely of frit on clear with No Days Liquid Fusing Adhesive. 90 COE exclusively... I did not have to fire it several times to facilitate full burnout of the adhesive because the clear piece of glass is on the bottom of the frit. This means the adhesive can escape straight up and out of the piece, unlike the previous pictures of the dogwood plate where the adhesive had to escape beneath the clear glass to the edges before burning off.
Also, notice the addition to my kiln shelf of fire paper. Firing on fire paper ensures that any air between the kiln shelf and the plate has a chance to escape, meaning that I get no big, unexpected bubbles bursting through the top of my plates!

Ahhh! What a feeling! Finally finished, well, except for the slump.

Tada! Full fused again and ready to slump. This particular mold is the Round Rippled Drop Out Mold from Slumpy's. I've been really into using drop-out molds against the kiln shelf to make nice flat-bottomed plates. Flat-bottomed plates make my slumping world go 'round...or something like that ;)

Post-slump firing in a drop out mold from Slumpy's.


Wow! You made it all the way to the bottom and the end of my saga! Hope you were able to follow along without too much confusion. However, if you've got questions, I'd love to hear them and see if I can't answer them, as well :) Leave a comment on the blog and I'll do my best to answer!

Monday, June 24, 2013

Q&A Monday ~ Cleaning up Liquid Fusing Adhesive

Continuing with the theme of clean up from last week, here's an email from P. wondering how to clean the Liquid Fusing Adhesive from hands and other surfaces...

Subject: Streuter Technologies: Liquid Fusing Adhesive

What can I use to clean up tools and my hands when I get the No Days Liquid Fusing Adhesive on them?
Thanks, P
No Days Liquid Fusing Adhesive

Hi, P~
The liquid fusing adhesive is sticky stuff! When you're done using it, you can use vegetable oil or petroleum jelly to help get the adhesive off of your hands and tools, then wash with soap and warm water. If there is still a residue, acetone (nail polish remover) will help get rid of it.
Hope that helps:)
Carrie

No Days Instructor and Support
Carrie Strope Sohayda

Hi, there! Carrie, here...

Not only do I travel the country teaching folks how to use No Days adhesives (and other techniques), but I also answer customer support emails about using No Days. So, if you're having an issue with the adhesives, chances are good that I'll be answering your questions!
Since I get so many good questions, I thought it might be a great learning opportunity for people that may be having some of the same issues but haven't thought to email us. Don't worry, I'll keep the emails anonymous!

Also, don't forget that we've got a lot of really fabulous videos (I put those together, too...) on our YouTube channel. So for those of you who are visual learners (umm...we're visual artists, right?), you may want to check them out!

If you've got questions, feel free to contact us at info@streuter.com.

Monday, June 17, 2013

Q&A Monday ~ Cleaning the Needle Tip on No Days Liquid Fusing Adhesive

Subject: Streuter Technologies: How to clean needle tip?

Is there any way to clean the needle tip for use with the No Days glue? It seems to be plugged, and I can't get it to work.

Thank you for any help-
X
Tiger Lily Flower Mandala plate created with frits using No Days Liquid Fusing Adhesive
Fused Glass Frit Painting done using No Days Liquid Fusing Adhesive

Dear X ~
My first question is which No Days glue are you using? Is it the No Days Liquid Fusing Adhesive or the HoneyDoo Zuper Glue? We sell both, and I just want to make sure I'm giving you the right answer.
I'm going to assume the No Days Liquid Fusing Adhesive (LFA)...
When the LFA dries, it is super strong! It can clog the tip or glue the needle in the tip, as well. However, the LFA will soften itself. If my tip (lid) is stuck together, I'll generally turn the bottle upside down for a few seconds and then wait for a bit and try to open the tip again. Sometimes I have to use my pliers to help pry the needle out. I have broken the needle off before, though, so make sure to let it soak itself.
If you're able to take the tip off of the bottle, you can soak it in acetone (nail polish remover) or denatured alcohol for awhile and then try to unclog it.
Let me know if this helps and if I'm answering the right question:)
Good luck!
Carrie
No Days Liquid Fusing Adhesive
with needle nose applicator tip
 
Thanks, Carrie!  I finally got it unplugged- but yes, I was referring to the Liquid Fusing Adhesive.  (I did have a bottle of the HoneyDoo Zuper glue too, but that stuff totally dried up for some reason) * Anyway, I will try holding the bottle upside down and see if that works next time- but for this time, I was finally able to get it unplugged with a straight pin, working from both ends, and blowing on it.  That could have been the solution to the problem, however I think it was laying on it's side for a few minutes, so maybe that was what opened it up!
Thanks for your help- 
Best wishes!

Honey Doo Zuper Glue
HoneyDoo Zuper Glue

*The shelf life of the HoneyDoo Zuper Glue is 9-12 months. After awhile, it will dry up. You can extend the shelf life of the Zuper Glue by storing it in a refrigerated area.

No Days Instructor and Support
Carrie Strope Sohayda

Hi, there! Carrie, here...

Not only do I travel the country teaching folks how to use No Days adhesives (and other techniques), but I also answer customer support emails about using No Days. So, if you're having an issue with the adhesives, chances are good that I'll be answering your questions!

Since I get so many good questions, I thought it might be a great learning opportunity for people that may be having some of the same issues but haven't thought to email us. Don't worry, I'll keep the emails anonymous!
Also, don't forget that we've got a lot of really fabulous videos (I put those together, too...) on our YouTube channel. So for those of you who are visual learners (umm...we're visual artists, right?), you may want to check them out!

If you've got questions, feel free to contact us at info@streuter.com.

Thursday, February 7, 2013

No Days Doodle Plate Project Sheet

To download the pdf, visit Streuter's project gallery.
Detail of 'Tiger Lily' by Calyx Glass
   The Doodle Plate is created using a sheet of clear fusible glass, Carolina frit, No Days Liquid Fusing Adhesive, Glassline pens and a pattern template. By designing on both sides of the clear glass, you can add a lot of depth and interest to your piece and make it look much more complicated than it actually is!

Tuesday, August 21, 2012

Creating Fused Glass Mosaics ~ A Tutorial

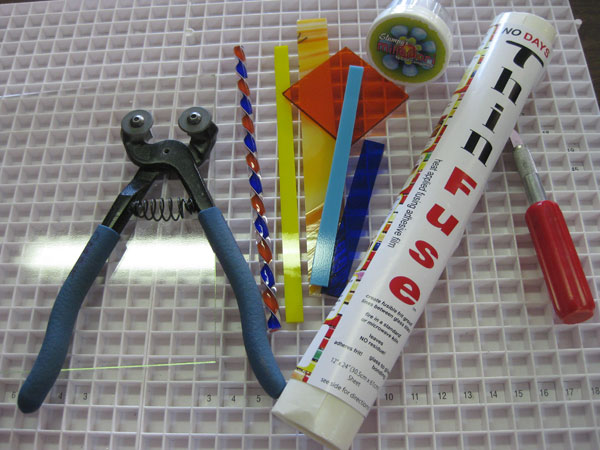
No Days ThinFuse is a thin heat activated adhesive film that allows you to build intricate fused glass designs in a comfortable workspace, and then easily transport your piece to the kiln, ensuring your design stays put. It essentially creates a faux tack fuse, allowing you to eliminate extra firings and cut back on the amount of time it takes to finish a multi-step fused glass project.  Once the adhesive has been heat set, you can continue to add elements to the piece before firing in a kiln.  ThinFuse is a perfect solution for creating quick & easy fused glass mosaics.
Tools and Materials
Materials:
  • No Days ThinFuse Adhesive
  • fusible Spectrum System 96 glass
  • System 96 Carolina Frit
  • Ryan Staub fusing cane
  • No Days Liquid Fusing Adhesive
Tools:
  • glass cutter, running pliers, mosaic nippers
  • scissors or craft blade
  • spoon, small brush
  • standard heat gun, embossing tool, or conventional/toaster oven
  • kiln

Monday, July 16, 2012

Creating Fused Glass Mosaics Using No Days ThinFuse

To download the pdf, visit Streuter's project gallery.


Creating fused glass mosaics is a breeze using No Days ThinFuse. When you heat set the adhesive to hold the glass pieces in place, you create a faux tack fuse with a super strong bond that allows you to "frout" (grouting with frit) your piece without waiting! If the glass pieces set up but they're not where you want them, simply re-heat to re-position the piece.


Monday, April 23, 2012

Frit Painting Mandalas with NO Days Liquid Fusing Adhesive

Ready to fire in the kiln
No Days Liquid Fusing Adhesive can be used with frits to easily create complex designs. In this set of Mandala plates, I've added Glassline Pens to the mix to add extra layers and dimensionality.
Base layer of clear becomes the clear cap

Thursday, April 12, 2012

No Days Fused Glass Coaster Project Sheet

To download the pdf, visit Streuter's project gallery.
The No Days Fused Glass Coaster Project is a perfect introduction to No Days Liquid Fusing Adhesive and No Days Fusing Adhesive Squares. This project can be completed in about an hour. The templates for the frit painting is below:
To download the pdf, visit Streuter's project gallery.

Friday, March 23, 2012

Ceramajam 2012 - Belmont, North Carolina

Frit Painting on Spectrum System 96 glass with Glassline Pens,
Carolina Frit and NO Days Liquid Fusing Adhesive

NO Days just returned from Belmont, North Carolina, where we attended Ceramajam 2012 at Bisque Imports. The theme this year was "Around the World" and everyone stamped their passports with "Glasslandia" after visiting the glass corner of the globe with NO Days and Spectrum Glass.

Filling in with frit after tracing the template design with Glassline Pens

Thursday, September 15, 2011

Creating Fused Glass Mosaics Using NO Days ThinFuse Adhesive


Creating Fused Glass Mosaics Using NO Days ThinFuse

Materials:
NO Days ThinFuse Adhesive
fusible Spectrum System 96 glass
System 96 Carolina Frit

tools:
glass cutter, running pliers
spoon, small brush
standard heat gun, embossing tool, or conventional/toaster over
kiln

Thursday, September 8, 2011

Creating Functional Fused Glass Art with No Days Liquid Fusing Adhesive and Carolina Frit


Creating Functional Fused Glass Art with No Days Liquid Fusing Adhesive


Materials:
-No Days Liquid Fusing Adhesive
-Carolina Frit in various sizes
-Spectrum System 96 fusible glass


Tools:
-small spoon for scooping frit
-various tools for moving frit
-inspirations/images/sketches

No Days Liquid Fusing Adhesive makes painting with frits and powders an option even for glass enthusiasts that have to transport their work to a local glass shop or studio to be fired. The biodegradable, strong fusing adhesive burns free of residue. The ultra fine tip needle dispenser makes pinpointing the application of the adhesive simple. Watch as we show you how to create detailed and intricate designs for your fused glass!

Thursday, August 18, 2011

Fused Glass Mosaics with Vicki Day and Nola Cabral of The Stained Glass Shop


August, 2011 Featured Artists - Vicki Day & Nola Cabral of The Stained Glass Shop...
Meet featured artists Vicki Day and Nola Cabral of The Stained Glass Shop in Glendale, Arizona.
Vicki and Nola bought the shop in 1986, which had sold traditional leaded glass supplies, finished goods and held classes from a suburban strip mall since 1971.

Warm glass was incorporated into traditional stained glass, and the Shop’s classes, virtually from the beginning. Shortly after purchasing the shop, Vicki and Nola went to their first trade show, took their first fusing class and bought their first kiln. Vicki then traveled to Los Angeles and took a class from Gil Reynolds and her fusing career took off. Originally, Gil traveled to Glendale to teach fusing classes for the shop; then Vicki assumed that role and Gil visited to teach only specialty fusing techniques. Vicki’s expertise and continuing education has allowed her to become The Stained Glass Shop’s professional when it comes to fused glass.


In 2001, The Stained Glass Shop moved into a space designed and built to their specifications to enable them to provide more warm glass classes.

 Although the shop is just across the street from the old location, they have more retail space as well as a better-designed teaching area. They also have the capacity to run three - 220V kilns and six - 8” kilns all at the same time! When teaching some techniques they need all that fire power!
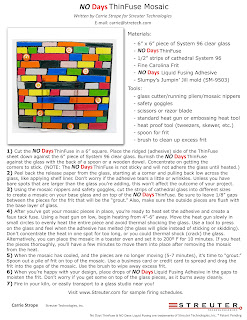
Their fused glass mosaic technique has been developed over time with the help of two special people: Diane Sepanski, who had the original idea, and Mary Beth Maddox, who helped define the new process. Vicki & Nola love using No Days ThinFuse Adhesive in their Fused Glass Mosaic Classes because it eliminates a firing and cuts back on the amount of time it takes to finish a project. Prior to the advent of No Days Thin Fuse Adhesive, the colored tile pieces would be laid on the background glass, then the piece would be tack-fused. Now the pieces can be heat set with the adhesive, allowed to cool, and finished with frit glass grout all before being kiln fired.

The Stained Glass Shop is a full-service retail store. The shop provides glass, supplies and a large variety of classes in both traditional lead and copper foil stained glass techniques, beginning fusing and specialty fusing, mosaics, precious metal clay, wire working, silver jewelry techniques and much more.

Visit Vicki and Nola at www.stainedglass-shop.com to learn more!

Thursday, June 16, 2011

Casting Glass with Glenda Emory


June, 2011 Featured Artist - Glenda Emory of Glenda Emory Designs.  
  Glenda works as the Studio Specialist & Instructor at Hollander Fusing Center in Atlanta, Georgia. She is also the secretary for the Atlanta Glass Art Guild. Glenda became enamored with glass fusing after taking a beginning class in 2006.

She loves using No Days Liquid Fusing Adhesive for kiln casting because "it allows you to pile more glass into the mold, therefore getting more out of your cast piece. The No Days keeps the glass that sits above the mold line from shifting and ruining the mold or making a mess in the kiln."

When frit painting, Glenda loves using No Days Liquid Fusing Adhesive as "it is great for helping the frit stay in place once you have your design in place.  No Days Fusing Adhesive also lets you build up the frit in areas where you want bold color or more texture with out having to wait for the initial layers to dry between each application of frit. I is a great time saver when doing frit painting."

Wednesday, March 9, 2011

Frit Painting on Fused Glass with No Days Liquid Fusing Adhesive


Frit Painting with No Days Liquid Fusing Adhesive

No Days Liquid Fusing Adhesive makes painting with frits and powders an option even for glass enthusiasts that have to transport their work to a local glass shop or studio to be fired. The biodegradable, strong fusing adhesive burns free of residue. The ultra fine tip needle dispenser makes pinpointing the application of the adhesive simple. Watch as we show you how to create detailed and intricate designs for your fused glass!