Interested in becoming a NO Days Featured Artist?

Interested in becoming a NO Days Featured Artist?


Want to share your artwork made using NO Days products with the world? We want to help you promote your work! We love seeing the various ways artists are using NO Days products! We share our Featured Artist spotlight with our newsletter subscribers, our Facebook friends and fans, on our Featured Artist Page and right here on our blog, linking back to your website.

Simply send an email to info@nodaysadhesives.com with the subject: Featured Artist. Be sure to include your name, email address, and website (if you have one) along with a brief bio and pictures of yourself and your artwork made with NO Days Products. Not sure what to include in a bio? Tell us how you became interested in playing with glass or crafts. How about where you get your inspiration? Oh! And don't forget to tell us why you love using NO Days!
Showing posts with label no days. Show all posts

Monday, November 10, 2014

2015 Glass Craft & Bead Expo ~ Glass on Glass Mosaics with Carrie Strope

Wednesday, April 8th, 2015 from 9:00 AM - 5:00 PM
Instructor Carrie Strope

In this all day class, you will sharpen and hone your glass cutting skills while building an 11” framed mosaic that’s ready to take home at the end of class.
Glass on Glass Mandala Mosaic made with recycled church windows
by Carrie Strope
 You will learn tricks for cutting circles, how to frame your mosaics with zinc edge came, basic soldering skills needed to make your own metal frames, tips and tricks for working with No Days Groutless, and how to choose the best adhesive for your project (several different examples made with different adhesives and the pros and cons of each will be on display for discussion).
Glass on Glass Mosaic created using No Days Mosaic Adhesive
 We will discuss basic color theory to help you choose your glass, talk about pattern variations and the best way to approach cutting a pattern out of a sheet of glass and finish with grouting pointers as we complete a mosaic in one day!
Stained glass window panel with fused glass inclusions as well as
glass on glass flower inclusions
 If you've ever wanted to explore mosaics or enhance your repertoire, Carrie will show you how easy it is to start combining your skills to create unique pieces with mosaic, stained glass and fused glass.
This is also the perfect class to brush up on your cutting skills! Learn tips for glass cutting from the 2014 Super Pro Glass Cutting Champion!
Super Pro Glass Cutting Contest at the 2014 Glass Craft & Bead Expo
  Students bring: safety glasses and glass cutting tools. Some cutting tools will be available for classroom use.
Fused glass sconce night light created with the same pattern
from the mosaic mandala class. Get tips for cutting glass
to create stunning fused glass art.


Wednesday, November 20, 2013

Pacific Artglass' 9th Annual Glassfest and a new mosaic sign


Pacific Artglass' new No Days Mosaic Entrance sign

Every year, Pacific Artglass in Gardena, California hosts a spectacular event, GlassFest, a weekend filled with fun, food, demonstrations, prizes, workshops...whew! It's a glass-lovers' dream!
Leigh is always smiling!

This year, artist extraordinaire, Leigh Adams joined the mix to demo No Days products AND create a new mosaic sign for the entrance of Pacific Artglass using No Days Mosaic Adhesive.
Leigh recruited her "Mosaic Mafia" mosaic fiends to help with her cause.
Heat setting the pieces in place and getting ready to grout.

The lovely ladies that made the sign possible!


Pacific Artglass' John Williams lends a smile and a hug.

Wednesday, October 23, 2013

Linda's No Days Mosaics

Linda's beautiful garden bench
We love it when you share your projects with us! It's so inspiring to see the creativity that all of our No Days family members (that's you!) possess. Here are some photos that Linda shared with us...

Linda's Gorgeous Groutless Mosaic Upcycled Chair
"I used  No Days Mosaic Adhesive on this project. I use it on almost all my projects. I have also used the Groutless Mosaic Adhesive. I like taking old things and making them look beautiful. I am going to attach a few other pictures to show you. The chair I am sending you was made with the Groutless because I felt grout would not last in that area." 
Linda's Mosaic Mailbox
"I love doing glass on glass. I still have not been able to keep bubbles from showing, but when I use the right glass very little shows. I am not able to put my glass on glass in the oven because of the size of the pieces. I have seen the work of others that you have put online and I think mine is so simple compared to some you have shown. I learned how to do stained glass more than 35 years ago. I then raised a family and had a teaching job.  I just retired last year and went to the stepping stone class. I have found something that I love to do again!"  
Linda's Lovely stained glass mosaic recycled window
"Because of No Days Mosaic Adhesive I have tried so many things. There really isn't much more room in my house, I will have to start making things for others! I have decided if I can not sell things, people will start getting them as gifts... I'm not going to stop trying to make things better...Oh, use any picture you like, all was made with No Days Mosaic Adhesive." ~Linda
Linda's wonderful woodland window
Check out more of Linda's creations at Garlin Stained Glass on Facebook!

Wednesday, October 2, 2013

How to Make No Days Mosaic Nightlights


Tools & Materials:
  • glass base - can be a circle, square, rectangle of plate glass or stained glass (textured stained glass adds a nice look)
  • scrap glass, tiles, millefiori, etc.
  • mosaic nippers
  • circle cutting system (if you're going to cut circles, this is the easiest solution aside from buying them)
  • glass grinder
  • safety glasses
  • No Days Mosaic Adhesive
  • standard heat gun or embossing heat tool
  • long tweezers
  • night light hardware
  • sanded grout : container to mix it in, water, gloves, paper towels (You can use No Days Groutless Mosaic Adhesive to skip this step, but you may need to use a different adhesive for gluing the bail, or come up with a creative jig for holding the clip.)

Start by cutting your base piece of glass. If you want to cut circles, here are a couple of videos to help you with that...

How to cut circles using a circle cutter:


I am using plate glass in the video above. However, plate glass can be kind of brittle. If you're having a hard time, you could try using Spectrum's System 96 clear glass; it cuts like butter!

How to cut circles using a the Morton teeny tiny circle cutter:


After you've cut your glass bases, you need to make sure that the edges aren't going to bite anyone. So, get on the grinder and soften them up. Just make sure to get rid of the sharp corners. When grinding glass, you need to use water. If you're unsure of how to do this, find a local stained glass shop and they'll show you what you need to do. They can sell you a grinder or rent you one to use in the shop. If you're really lucky, they'll let you rent it for take home use, but very few shops do this!

The short video above shows my grinder set up. I've got  Mr. Splash that lives behind my grinder to prevent splashing glass dust and water from getting everywhere. I wear safety glasses while grinding, but have often had glass bits fly at my face, so to prevent that I have a sheet of 1/4" plate glass that rests across the top of my splash guard.

Now, you're ready to start building your mosaic. Start by cutting the No Days Mosaic Adhesive to the size of your glass base. Nip various bits of glass or follow a pattern and cover your glass substrate (base). When you've got it filled, you're ready to heat set the No Days Mosaic Adhesive. Make sure you're working on a heat proof surface and that you've made sure that all melt-ables are out of the way. (This includes excess adhesive!)
Using an electric skillet to heat set glass on glass mosaics.

 If you've got an electric skillet or toaster oven, you can use those to heat set the adhesive, as well. Set the temperature to 200º F (93º C) and let them cook for 10-15 minutes.  As the adhesive liquefies, some of the mosaic bits may move around. While the mosaic is still hot, use your tweezers to nudge the pieces into place. Then, let the mosaic cool while you assemble your grouting station:
Grouting can be messy, so I like to grout outside!
Gather your grout, a mixing cup, water, and gloves. When your mosaic has cooled, it's ready to grout. Check out the video below to see the grouting process, starting at minute 4:00...


 Now, you need to glue the nightlight clip on the back of your mosaic. Cut a small length of No Days Mosaic Adhesive, about 2" x 1/4." Place the adhesive film on the back of the nightlight clip and put that on the back of your mosaic where you want it to attach.
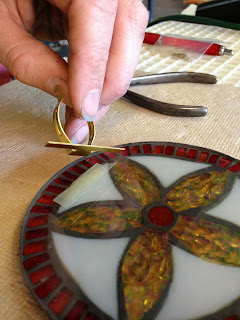
Cut a 1/4" strip of No Days Mosaic Adhesive to put under the night light clip.
Cut a 1/4" strip of No Days Mosaic Adhesive to put
under the night light clip.

Working on the heatproof surface again (I use a square homosote board. Most big box hardware stores carry this in large sizes, but some stained glass shops have this cut into smaller sizes.), turn your heat gun on and have your tweezers out to hold onto the clip while you hit it with heat. It's possible that if you heat too long, your mosaic pieces could fall out. But, I didn't have this problem. You have to heat long enough to get your glass base hot, and I stopped when the grout started to become blacker (that means the adhesive is wet). However, if you attach your clip right after grouting, you won't see this happen, because the grout is still wet.
Use tweezers to hold the clip in place while heat setting the adhesive.
Use tweezers to hold the clip in place while heat
setting the adhesive.

Again, let your mosaic cool down, so the clip is firmly attached.
Screwing on the night light clip hardware.
I prefer the screw on clip for night lights because you can
really firm up the grip on the nightlight shade.
  Then put your nightlight hardware together and your night light is ready to plug in!

No Days Mosaic Nightlight by Carrie Strope Sohayda of Calyx Glass
No Days Mosaic Nightlight by Carrie Strope Sohayda

Friday, September 6, 2013

Tips & Tricks ~ No Days Mosaic Adhesive on a Glass Tabletop

Donna's Poolside Hibiscus Mosaic Tabletop
 Occasionally, we get asked if it's okay to use No Days Mosaic Adhesive on large glass tabletops.  I've never really been sure if it would work or not, due to the fact that you have to heat the glass to 160ºF (71ºC) to get the pieces to adhere properly. When heating large pieces of glass, there's a possibility of thermal shocking and shattering the glass, if it's not heated evenly across the entire surface of the glass.

 However, we received these amazing photos of a hibiscus mosaic tabletop completed by Donna using No Days Mosaic Adhesive film and stained glass on a tempered glass tabletop.

"I made this mosaic hibiscus table using NO Days Mosaic Adhesive Film.  I covered the entire glass table with the film, placed my glass on the top of the film and heated both the top and underside of the table with a heat gun.  It worked great!!!  If I needed to move something, I just reheated that area and moved it. The table was made with tempered glass, I think that’s why it didn’t break.  I have also turned the table completely upside down, and it all held together."

Thanks for sharing, Donna!

We love seeing pictures of pieces made using No Days adhesives. If you've got something you've made that you'd like to share, please email us at: info@streuter.com.

Thursday, September 5, 2013

Streutertech on Instagram

Streutertech on Instagram
Did you know you can find more pictures of what we're up to on Instagram? Above you can see our feed after a day of experimenting with our Groutless Mosaic Adhesive for making a birdbath. It's a pictorial walk-through of the project; so if you're a visual person, head over to Instagram and find us!

In addition to process pics and projects using No Days adhesives, we'll post artsy and glass travel pics from around the country. See our No Days Road Shows from the inside, even if you can't make it.

Sunday, September 1, 2013

Nana-Dictta's No Days Mermaid Mosaic

Custom Micro-Mosaic commissioned by the Creative decorating solutions
by Nana-Dictta/ Naiktta Fine Art.
We love getting feedback from artists using our adhesives! We received the following email along with the above picture of the gorgeous mermaid mosaic...

 I recently ordered some material from you; and as you already know I specialize in Fine Micro-Mosaic design.

I am simply sharing the work I did with no days… please see the attached picture.
 
You have a wonderful product and thank you so much for helping all Fine Mosaic artists!

Kindly visit and like us on Facebook Page http://www.facebook.com/Nana-Dictta

Best Regards.
Nana-Dictta
http://www.naikttafineartmosaics.com/

If you'd like to share your experiences using No Days adhesives or work created with No Days, please send an email to info@streuter.com or visit our Facebook page.

Monday, June 24, 2013

Q&A Monday ~ Cleaning up Liquid Fusing Adhesive

Continuing with the theme of clean up from last week, here's an email from P. wondering how to clean the Liquid Fusing Adhesive from hands and other surfaces...

Subject: Streuter Technologies: Liquid Fusing Adhesive

What can I use to clean up tools and my hands when I get the No Days Liquid Fusing Adhesive on them?
Thanks, P
No Days Liquid Fusing Adhesive

Hi, P~
The liquid fusing adhesive is sticky stuff! When you're done using it, you can use vegetable oil or petroleum jelly to help get the adhesive off of your hands and tools, then wash with soap and warm water. If there is still a residue, acetone (nail polish remover) will help get rid of it.
Hope that helps:)
Carrie

No Days Instructor and Support
Carrie Strope Sohayda

Hi, there! Carrie, here...

Not only do I travel the country teaching folks how to use No Days adhesives (and other techniques), but I also answer customer support emails about using No Days. So, if you're having an issue with the adhesives, chances are good that I'll be answering your questions!
Since I get so many good questions, I thought it might be a great learning opportunity for people that may be having some of the same issues but haven't thought to email us. Don't worry, I'll keep the emails anonymous!

Also, don't forget that we've got a lot of really fabulous videos (I put those together, too...) on our YouTube channel. So for those of you who are visual learners (umm...we're visual artists, right?), you may want to check them out!

If you've got questions, feel free to contact us at info@streuter.com.

Monday, June 17, 2013

Q&A Monday ~ Cleaning the Needle Tip on No Days Liquid Fusing Adhesive

Subject: Streuter Technologies: How to clean needle tip?

Is there any way to clean the needle tip for use with the No Days glue? It seems to be plugged, and I can't get it to work.

Thank you for any help-
X
Tiger Lily Flower Mandala plate created with frits using No Days Liquid Fusing Adhesive
Fused Glass Frit Painting done using No Days Liquid Fusing Adhesive

Dear X ~
My first question is which No Days glue are you using? Is it the No Days Liquid Fusing Adhesive or the HoneyDoo Zuper Glue? We sell both, and I just want to make sure I'm giving you the right answer.
I'm going to assume the No Days Liquid Fusing Adhesive (LFA)...
When the LFA dries, it is super strong! It can clog the tip or glue the needle in the tip, as well. However, the LFA will soften itself. If my tip (lid) is stuck together, I'll generally turn the bottle upside down for a few seconds and then wait for a bit and try to open the tip again. Sometimes I have to use my pliers to help pry the needle out. I have broken the needle off before, though, so make sure to let it soak itself.
If you're able to take the tip off of the bottle, you can soak it in acetone (nail polish remover) or denatured alcohol for awhile and then try to unclog it.
Let me know if this helps and if I'm answering the right question:)
Good luck!
Carrie
No Days Liquid Fusing Adhesive
with needle nose applicator tip
 
Thanks, Carrie!  I finally got it unplugged- but yes, I was referring to the Liquid Fusing Adhesive.  (I did have a bottle of the HoneyDoo Zuper glue too, but that stuff totally dried up for some reason) * Anyway, I will try holding the bottle upside down and see if that works next time- but for this time, I was finally able to get it unplugged with a straight pin, working from both ends, and blowing on it.  That could have been the solution to the problem, however I think it was laying on it's side for a few minutes, so maybe that was what opened it up!
Thanks for your help- 
Best wishes!

Honey Doo Zuper Glue
HoneyDoo Zuper Glue

*The shelf life of the HoneyDoo Zuper Glue is 9-12 months. After awhile, it will dry up. You can extend the shelf life of the Zuper Glue by storing it in a refrigerated area.

No Days Instructor and Support
Carrie Strope Sohayda

Hi, there! Carrie, here...

Not only do I travel the country teaching folks how to use No Days adhesives (and other techniques), but I also answer customer support emails about using No Days. So, if you're having an issue with the adhesives, chances are good that I'll be answering your questions!

Since I get so many good questions, I thought it might be a great learning opportunity for people that may be having some of the same issues but haven't thought to email us. Don't worry, I'll keep the emails anonymous!
Also, don't forget that we've got a lot of really fabulous videos (I put those together, too...) on our YouTube channel. So for those of you who are visual learners (umm...we're visual artists, right?), you may want to check them out!

If you've got questions, feel free to contact us at info@streuter.com.

Tuesday, May 14, 2013

The Vinery Stained Glass Shop Road Show ~ Madison, WI

Denny gave me a quick tour of his new location.
He's got this Saguaro skeleton that's been with him for years.
Denny's new location is HUGE! He's been there for 6 months and it still smells brand new. He's got tons of glass on display, as well as finished projects. I got the grand tour as soon as I arrived.
Next to the front door of the store
There's plenty of room to walk around and everywhere you look there's eye candy. The store is divided into areas for make and take fused glass pendants, lampworking, stained glass, mosaic and fused glass classes.
He's also got his very first stained glass piece that he made by teaching himself
from a book when he was 24...just a few years ago. He's also got his very own Peter McGrain portrait looking over his precious.
Denny planned a full day with his Customer Appreciation Event occurring at the same time as the No days Road Show. The first 150 customers through the door got swag bags. There was a full demo schedule for glass cutting, the Morton System, bottle cutters, flameworking, foil repair, fusing ideas, programming your kiln, and of course, No Days adhesives!

Thursday, April 18, 2013

2013 American Mosaic Summit ~ Tacoma, WA


 The 2013 American Mosaic Summit has come to a close. We had a blast meeting new people, greeting old friends, finding new materials, sharing new techniques, and above all seeing the multitude of gorgeous mosaics!

Streuter Technologies' No Days Instructor Carrie Strope was able to team up with Susan Gamble of Santa Theresa Tileworks and Steve Shupper of Glass Accessories International to offer 2 four hour workshops titled, "Mixing It Up and Making It Great: Expanding Your Creativity with New Products and Technology." 

The workshops were open to all skill levels and focused on expanding the creative approach and mosaic materials palette, trying new tools and increasing knowledge of mounting methods and products for small and large scale, indoors and out-of-door projects.

 Students designed impromptu mosaics using Spectrum glass, Van Gogh glass, and thin, high fired, frost-resistant Skinny Tiles made by Santa Theresa Tile Works on wedi board with No Days Groutless Mosaic Adhesive, No Days Q Stik, or No Days Mesh.

Susan Gamble offered inspiration for design with a colorful presentation featuring various installations using Santa Theresa tiles and No Days adhesives. Steve Shupper gave a thorough overview of cutting glass and tiles using Toyo cutters and the Morton Portable Glass Shop to make strips, squares, triangles, diamonds and more. Carrie Strope finished by giving a quick demo of using Streuter's heat set adhesives and how to choose the proper adhesive for the job.

Not only did students leave with a nearly completed mosaic (we didn't grout in class), they received a special treat, as well! Steve handed each student the new Toyo pistol grip cutters with tap wheel (or vibrational) heads. Each student also went home with a roll of No Days Groutless Mosaic Adhesive, and samples of No Days Q Stik and Mesh.

We hope that everyone enjoyed themselves as much as we did and can't wait to see pictures of finished projects! Thanks to everyone that took the class or stopped by the booth in the vendor marketplace. We can't wait for next year!

Thursday, April 11, 2013

Merle Art Design ~ "Tree of Life"


   Merle Bouffard of Merle Art Design recently shared some images of a mosaic she completed for an assisted living facility in Canfield, Ohio. The "Tree of Life" is an 8 foot by 12 foot mosaic feature in the main lobby of The Inn at Ironwood. "I'm thrilled to have been able to create something for the residents there to enjoy."

Detail: "Tree of Life," Italian Glass, copper, steel, No Days Mosaic Mesh

The tree sculpture consisted of several pieces of steel colorized with patinas and pigment. The leaves are steel covered with Italian glass mosaic combined with copper leaves individually hand painted and colorized with metal stains. The result was a spectacular yet tranquil scene.
 
Merle Bouffard's "Tree of Life" ~ 8' x 12' ~
Italian glass, steel, copper, No Days Mosaic Mesh

See more pictures of the process at Merle Art Design.

Friday, March 22, 2013

Groutless Letter Mosaic Project Sheet

To download the pdf, visit Streuter's project gallery.
Using No Days Groutless Mosaic Adhesive to create mosaics cuts down on the messiest part of the process leaving you with a finished mosaic in no time at all. Create custom letters to hang on your wall or decorate a child's room with whimsy!

Approximate time to complete project = 1 hour


Monday, February 25, 2013

Featured Artist ~ Merle Bouffard of Merle Art Design

Merle Bouffard is the artist and designer behind Merle Art Design. She specializes in custom elements for the home including furniture, Italian glass and marble mosaic, and wall art. "I love providing decorators or home-owners something that has personal meaning as well as serving as a functional piece of art. "
Merle Bouffard and a custom back splash she created using No Days Mosaic Mesh
Merle enjoys using heat activated No Days Mosaic Mesh for mounting her mosaics because "it is great for delicate glass mosaics, but is also strong enough to hold the marble pieces together as well." She also likes to stabilize her intricate mosaics further by "front mounting with paper and back mounting with the No Days Mosaic Mesh. It is the way to go!"  

Gorgeous bathroom with matching dogwood mosaics
For the Dogwood Mosaic in the picture above, Merle used a similar technique. "It was an intricate glass mosaic of Dogwood flowers for a shower floor installation. It was 4' x 4'. The mosaic was so complex, I really didn't want to separate it into too many pieces to install. I face mounted it with paper then turned it over and back mounted it with the No Days Mosaic Mesh. I used the heat gun you sent that allowed instant adhesion with no disturbing of the tiles. It was great!! My installer applied a skin coat of thinset as well and let it dry. We were able to lift and maneuver a very large piece without losing one piece of glass. I'm so glad I found this product. It is the answer for so many problems and frustrations I've had in the past."


Merle is a prolific designer and creator; check out more of her work with No Days Mesh here. To see more of her designs for the home, including wall art and tables, visit http://MerleArtDesign.etsy.com
Merle Bouffard's "Tree of Life" ~ 8' x 12' ~
Italian glass, steel, copper, No Days Mosaic Mesh

Pictured above is an 8 foot by 12 foot "Tree of Life" mosaic Merle created using No Days Mesh, Italian glass, patinated steel, and copper.  She shares more of the process here.


Wednesday, October 10, 2012

No Days Featured Artist - Karen Dixon of Karen Dixon Kiln-Formed Glass

Karen Dixon of Karen Dixon Kiln-Formed Glass

Karen Dixon is an award winning glass artist.  Her work has been exhibited throughout the south at juried gallery and museum exhibitions. Her most recent award was the Maury Smith Award at the 39th Annual Montgomery Art Guild, Montgomery Museum of Fine Art Exhibition in spring 2011.  
Karen is a co-owner of Dixon-Ballog Glass Gallery & Studio, LLC located just south of Birmingham in Pelham, AL. The studio offers  a fine art glass gallery, architectural commissions and courses in kiln-formed glass.


Karen holds a Ph.D. in biochemistry and molecular genetics from the University of Alabama at Birmingham.  Her training as a scientist has been instrumental in her commitment to fine craftsmanship and attention to detail.  It is this love of experimentation that continues to drive her technical development as a specialist in kiln-formed glass.


 "I use lots of pieces and layers in my work.  I was very happy to find No Days Liquid Fusing Adhesive so parts stay where I place them, and it sets up quickly. I especially like it for creating projects with multiple layers that require specific placement of pieces to give a dimensional effect. It saves time and it fires clean at tack, full and casting temperatures."  


 In addition to creating her own artwork, Karen also teaches classes and co-runs a glass gallery, Dixon-Ballog Glass Gallery and Studio. They offer everything from walk in projects to classes on box and open face castings.


 For Karen's personal website, visit www.kdixonglass.com.
For more information on the glass studio, gallery and classes offered, visit www.dixon-ballog.com.


Friday, August 17, 2012

Featured Artist Laury Burns of Mywave Mosaics

Laury Burns of Mywave Mosaics

Laury Burns of Mywave Mosaics hails from a large family, the youngest of 7 kids, who were interested in all things art from a very young age. She made a conscious decision during childhood not to major in art, believing it would be too hard to make a living as an artist. With her father's profession as an anatomy professor, and her love of math and science, it made sense for Laury to get her B.S. in Zoology instead.
Mosaic Bull Skull