Interested in becoming a NO Days Featured Artist?

Interested in becoming a NO Days Featured Artist?


Want to share your artwork made using NO Days products with the world? We want to help you promote your work! We love seeing the various ways artists are using NO Days products! We share our Featured Artist spotlight with our newsletter subscribers, our Facebook friends and fans, on our Featured Artist Page and right here on our blog, linking back to your website.

Simply send an email to info@nodaysadhesives.com with the subject: Featured Artist. Be sure to include your name, email address, and website (if you have one) along with a brief bio and pictures of yourself and your artwork made with NO Days Products. Not sure what to include in a bio? Tell us how you became interested in playing with glass or crafts. How about where you get your inspiration? Oh! And don't forget to tell us why you love using NO Days!
Showing posts with label emails. Show all posts

Monday, November 4, 2013

Q&A Monday ~ Vertical Mount Mosaic with Mesh

Subject: mosaic product question
I an interested in doing some mosaic work on  concrete wall outside. Is there a product that would work well for this? It needs to be able to withstand winter and hot summer conditions as I am located in KS.
Thank you,
S

No Days Mosaic Mesh allows you to build your mosaic on a horizontal
surface and then mount your mosaic vertically using thinset or mortar.

 Hi, S ~
The best way to approach the work you want to do would be to build your mosaic on mesh and then mount on the wall using an appropriate thinset / mortar.
Our No Days Mosaic Mesh has a heat set adhesive that holds the tiles to the mesh while you're building the mosaic. When the pieces are set in place, then you use thinset to attach it to the wall.
We have a YouTube channel and there's a quick video on the process here: http://www.youtube.com/watch?v=YHExYFozByA&feature=share&list=PL2470E6E3D2CD6545
There's an artist that uses our mesh all the time on installations and she likes to place and then heat set the tiles on the mesh. After the tiles cool down, she butters the back of the mosaic with a thin layer of thinset, which helps to stabilize the mosaic and makes it easy to install. http://nodaysadhesives.blogspot.com/2013/05/merle-art-design-custom-dogwood-bathroom.html
Hope this helps,
Carrie

Mosaic insert on stone bench, made using No Days Mosaic Mesh.


No Days Instructor and Support
Carrie Strope Sohayda

Hi, there! Carrie, here...

Not only do I travel the country teaching folks how to use No Days adhesives (and other techniques), but I also answer customer support emails about using No Days. So, if you're having an issue with the adhesives, chances are good that I'll be answering your questions!
Since I get so many good questions, I thought it might be a great learning opportunity for people that may be having some of the same issues but haven't thought to email us. Don't worry, I'll keep the emails anonymous!

Also, don't forget that we've got a lot of really fabulous videos (I put those together, too...) on our YouTube channel. So for those of you who are visual learners (umm...we're visual artists, right?), you may want to check them out!

If you've got questions, feel free to contact us at info@streuter.com.

Wednesday, October 23, 2013

Linda's No Days Mosaics

Linda's beautiful garden bench
We love it when you share your projects with us! It's so inspiring to see the creativity that all of our No Days family members (that's you!) possess. Here are some photos that Linda shared with us...

Linda's Gorgeous Groutless Mosaic Upcycled Chair
"I used  No Days Mosaic Adhesive on this project. I use it on almost all my projects. I have also used the Groutless Mosaic Adhesive. I like taking old things and making them look beautiful. I am going to attach a few other pictures to show you. The chair I am sending you was made with the Groutless because I felt grout would not last in that area." 
Linda's Mosaic Mailbox
"I love doing glass on glass. I still have not been able to keep bubbles from showing, but when I use the right glass very little shows. I am not able to put my glass on glass in the oven because of the size of the pieces. I have seen the work of others that you have put online and I think mine is so simple compared to some you have shown. I learned how to do stained glass more than 35 years ago. I then raised a family and had a teaching job.  I just retired last year and went to the stepping stone class. I have found something that I love to do again!"  
Linda's Lovely stained glass mosaic recycled window
"Because of No Days Mosaic Adhesive I have tried so many things. There really isn't much more room in my house, I will have to start making things for others! I have decided if I can not sell things, people will start getting them as gifts... I'm not going to stop trying to make things better...Oh, use any picture you like, all was made with No Days Mosaic Adhesive." ~Linda
Linda's wonderful woodland window
Check out more of Linda's creations at Garlin Stained Glass on Facebook!

Monday, October 21, 2013

Q&A Monday ~ Mosaic Mesh vs film adhesive

Subject: Exterior Mosaic project
I am working on a large 3' x 6' exterior glass tile mosaic. I thought I'd adhere it to backer board, working flat, then mount that to the wall for final placement. I was thinking of using your No Days Mesh, as I position the tiles. Then use Weldbond glue to adhere it to the backer board. Grout and seal. Now I am wondering if I should just use your Mosaic Adhesive Film. Would that product work on what will be hung vertically and be outdoors permanently?
Thanks for your help.
L

Thank you! Looking forward to using this. How long has this product been available?

Should I use No Days Mosaic film or Mosaic Mesh?

Hi, L :)
The mesh was meant to be mounted with mortar or thinset. I would suggest using the No Days Mosaic Adhesive Film if you'll be working directly on backerboard and then mounting. The adhesive only activates (or reactivates) at 160 degrees F, which is well above outdoor temperatures. The freeze thaw cycle doesn't affect it either.
Hope this helps. Let me know if you have further questions!
Carrie


No Days Instructor and Support
Carrie Strope Sohayda

Hi, there! Carrie, here...

Not only do I travel the country teaching folks how to use No Days adhesives (and other techniques), but I also answer customer support emails about using No Days. So, if you're having an issue with the adhesives, chances are good that I'll be answering your questions!
Since I get so many good questions, I thought it might be a great learning opportunity for people that may be having some of the same issues but haven't thought to email us. Don't worry, I'll keep the emails anonymous!

Also, don't forget that we've got a lot of really fabulous videos (I put those together, too...) on our YouTube channel. So for those of you who are visual learners (umm...we're visual artists, right?), you may want to check them out!

If you've got questions, feel free to contact us at info@streuter.com.

Monday, September 30, 2013

Q&A ~ Using No Days Q-Stik for Windows

Subject: Streuter Technologies: Q Stik temperatures

Can a glass piece made on No Days Q Stik be fitted vertically in a window (10 1/2"w x 23" h)  without problems?  I'm planning on building a window to fit a south facing window in Arizona. In the fall, winter & spring, the sun will be directly hitting the window. The room in the summer is not air conditioned, so inside temperature will be about 85-90 degrees.
Thanks!


Hi~
Are you wanting to do a mosaic on glass? The QStik isn't transparent, so you would be able to see the film between any pieces of glass.
Otherwise, the heat set adhesive doesn't reactivate until it reaches 160dF. It should be fine.
Does this help?
Carrie

Bobbi Barnes mosaic window made using No Days Q-Stik

Hi, Carrie~
I finished the 2 windows. I really like and enjoy using your products. The only problem I had was if the glass was uneven on the back the glue wasn't adhering to all the surface.
Thanks for your help!

Hope you enjoy the pictures; the design came from a few pictures and my brain!
Bobbi

Bobbi Barnes mosaic window made using No Days Q-Stik


Update: 
 To answer the question in the comments below and to clarify (ha!) the point of transparency, I've included some pictures of my own project that I threw together in 3 hours + plus grouting.
Backlit from the front. Carrie's project with Q-Stik and scrap stained glass.
Here is the window I threw together in one evening (minus grouting). I used glass strictly from the scrap bin in the studio, so I've got a wide variety of glasses to look through.
Backlit and looking at the back of the panel.
When the panel is lit from behind, the No Days Q-Stik doesn't really hinder the appearance of the mosaic window.
You'll notice that the non-transparency of the Q-Stik becomes a problem
if you're looking at the panel from the back, without back-lighting.
However, if the window is not lit from behind, well...then, you can see all the areas where the glass is not attached to the adhesive (bubbles) and a bit of a haze from the pressure sensitive adhesive film.
A big problem area for me was this bit of scrap stained glass
that made up the leaf. It was not flat at all! In fact, I went back and
intentionally broke it so it would lay flat without getting grout underneath.
The detail shot gives you a glimpse of my big problem area (from behind, so it's never a problem if no one sees this side of the window) where the glass I used for the leaf curves away from the window and adhesive sheet.

Hope this helps to clear up some of the questions. If not, let me know and I'll try to help out further!
~Carrie

Friday, September 6, 2013

Tips & Tricks ~ No Days Mosaic Adhesive on a Glass Tabletop

Donna's Poolside Hibiscus Mosaic Tabletop
 Occasionally, we get asked if it's okay to use No Days Mosaic Adhesive on large glass tabletops.  I've never really been sure if it would work or not, due to the fact that you have to heat the glass to 160ºF (71ºC) to get the pieces to adhere properly. When heating large pieces of glass, there's a possibility of thermal shocking and shattering the glass, if it's not heated evenly across the entire surface of the glass.

 However, we received these amazing photos of a hibiscus mosaic tabletop completed by Donna using No Days Mosaic Adhesive film and stained glass on a tempered glass tabletop.

"I made this mosaic hibiscus table using NO Days Mosaic Adhesive Film.  I covered the entire glass table with the film, placed my glass on the top of the film and heated both the top and underside of the table with a heat gun.  It worked great!!!  If I needed to move something, I just reheated that area and moved it. The table was made with tempered glass, I think that’s why it didn’t break.  I have also turned the table completely upside down, and it all held together."

Thanks for sharing, Donna!

We love seeing pictures of pieces made using No Days adhesives. If you've got something you've made that you'd like to share, please email us at: info@streuter.com.

Sunday, September 1, 2013

Nana-Dictta's No Days Mermaid Mosaic

Custom Micro-Mosaic commissioned by the Creative decorating solutions
by Nana-Dictta/ Naiktta Fine Art.
We love getting feedback from artists using our adhesives! We received the following email along with the above picture of the gorgeous mermaid mosaic...

 I recently ordered some material from you; and as you already know I specialize in Fine Micro-Mosaic design.

I am simply sharing the work I did with no days… please see the attached picture.
 
You have a wonderful product and thank you so much for helping all Fine Mosaic artists!

Kindly visit and like us on Facebook Page http://www.facebook.com/Nana-Dictta

Best Regards.
Nana-Dictta
http://www.naikttafineartmosaics.com/

If you'd like to share your experiences using No Days adhesives or work created with No Days, please send an email to info@streuter.com or visit our Facebook page.

Wednesday, August 28, 2013

Giving back to the Community ~ Steve's Kids

Second Grade Garden Sculpture ~ Serpent
We love receiving feedback from customers. We're always blown away by the amount of creativity there is out there! We also love to give back to the community whenever we can. In this case, we donated No Days Mosaic Mesh and No Days Glaze to the Old Town Academy for their annual fundraiser Gala. The students are led through the art making process by amazing teachers, artists, and volunteers creating fantastic artwork that gets auctioned off.
Starry Night Table created with No Days Mosaic Mesh

Monday, August 12, 2013

Children's Collaborative Oklahoma Mosaic with No Days Groutless

Dear Brad and Streuter crew,

Thought you might enjoy seeing the attached collaboration mosaic piece that was created by 12 budding Oklahoma artists, ages 5-7. This work of art would not have been possible without your "GROUTLess" product, AND, your willingness to work with me on pricing as a teaching artist! Many thanks from Oklahoma!

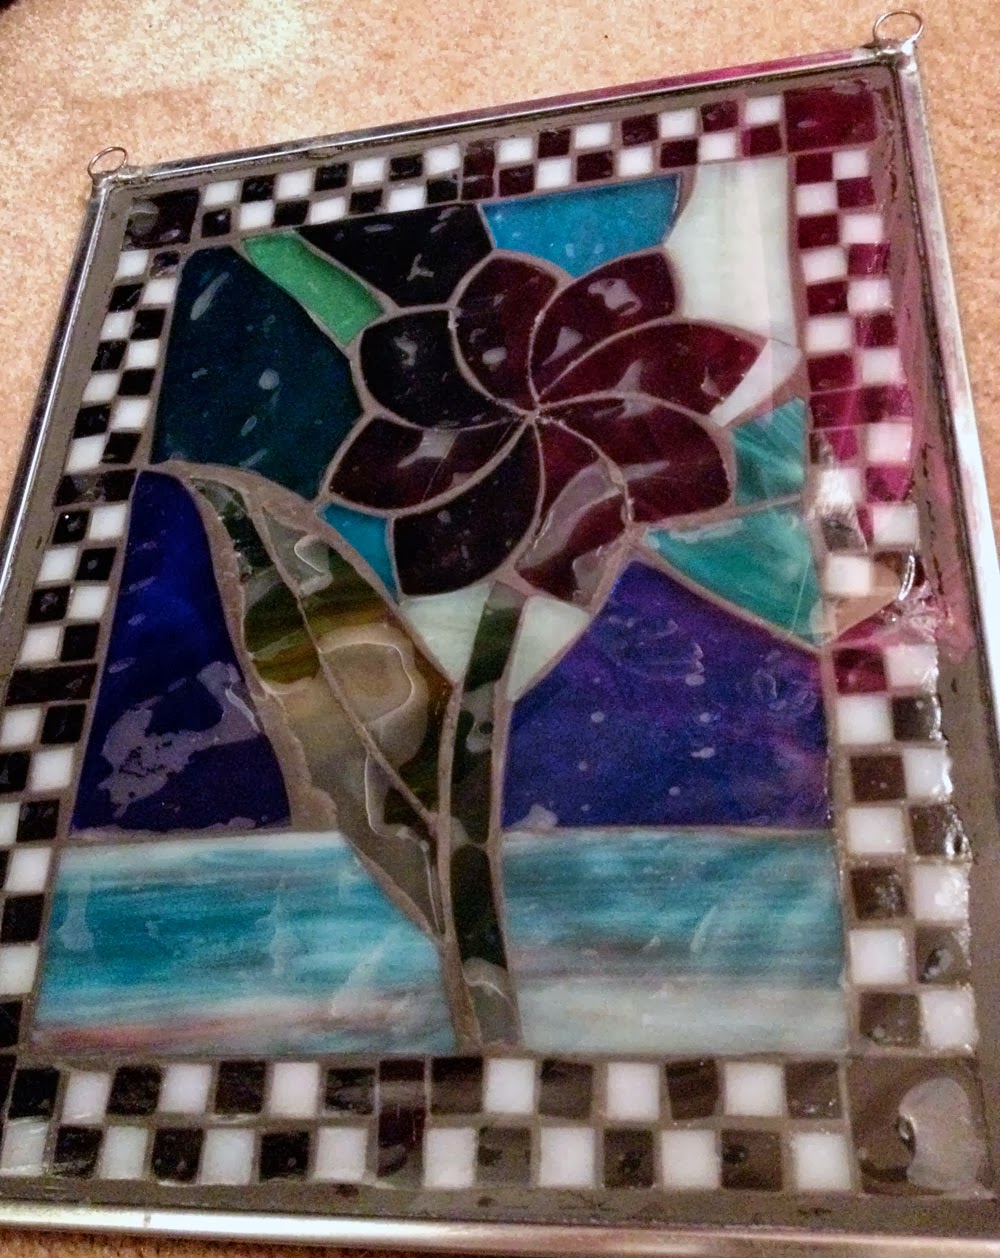
Mosaic created by 12 young artists in Oklahoma (ages 5-7)
using clear No Days Groutless Mosaic Adhesive.

Each of the twelve students were given a 7.5" x 8" piece of the map puzzle. Their only instruction was to follow the black lines with black tiles and not to use black anywhere else. They had no idea what they were creating. The excitement in the room grew as I had each student put their piece into place. The clear (Groutless) product was perfect, as they could see their "puzzle piece" through the product as they worked. We recreated the excitement on the final day by revealing this collaboration, installation, performance piece in front of the eyes of their parents.
Annalisa outside her art studio, Brayer & Brush
I have just now had a moment to look through the catalog you sent with the order. If all of your products are as perfect as "GROUTLess", I look forward to testing them in the future.

Many, many abundant thanks again for making this an affordable possibility as I work with students in Oklahoma!

Blessings,

Annalisa
Brayer & Brush on facebook


Annalisa Campbell of Brayer&Brush


Annalisa Campbell, Mixed Media Artist, Teaching Artist and Cheerleader for Oklahoma Arts, invites you in to the Gallery, Happenings, and Creative Learning Experience of Brayer & Brush.

3012 North Lee Avenue, Oklahoma City, 73103
405-204-1120

"As a Teaching Artist, Annalisa Campbell uses media, process and play, to experiment and explore creativity with her students. Learning how to express a moment or thought visually together.
Annalisa is an Oklahoma mixed-media and printmaking artist and expands her commitment to art through encouragement and education of other art explorers. This fuels Annalisa's art experience. She has recently opened her own teaching/working studio and gallery, Brayer&Brush, in the Paseo District. Receiving the 2011 Michi Susan Award and other awards for her art, teaching is still her greatest joy and fuel for her personal works."
"Annalisa is an Oklahoma mixed-media and printmaking artist and expands her commitment to art through encouragement and education of other art explorers. This fuels Annalisa's art experience. She has recently opened her own teaching/working studio and gallery, Brayer&Brush, in the Paseo District. Receiving the 2011 Michi Susan Award and other awards for her art, teaching is still her greatest joy and fuel for her personal works."

Monday, July 22, 2013

Q&A Monday ~ Mixed Media Techniques with Apoxie Sculpt & No Days Mosaic Mesh

Subject: Streuter Technologies: No Days Mosaic Mesh

Hi, this is my first time using your mesh, do I have to complete my project before using the heat gun or can I keep using the heat gun when I finish a section of my project before the complete mosaic is finished?

Also I want to use some beads in my mosaic can I use Apoxie Sculpt to lay my beads down in place and when the Apoxie drys use the heat gun for the surrounding stained glass?

Thank you,
Peggy Lindstrom

Detail of Peggy's owl on No Days Mesh with
Apoxie Sculpt holding the beads in place.

Hi, Peggy~
It's not necessary to finish the whole mosaic before heat setting sections. In fact, one mosaic artist I know likes to build cookie sheet sized sections of her mosaic, so she can put part of the mosaic in the oven to set while she works on the next section!
You do need to remember to build your mosaic on the No Days Mesh on top of the shiny side of the white release liner that comes in the package with the mesh. If you build on the non-shiny surface or forget it altogether, your mosaic and mesh will stick to the paper or surface that you're building on. After you've heat set a section, you do need to let it cool down before moving it, so that the release liner doesn't stick. The adhesive will peel off of it when it cools down, but when it's hot, it likes to stick to the liner.

The project you're working on sounds intriguing! I'd never heard of Apoxie Sculpt. I'm not sure what the makeup of the product is, but No Days Adhesive will stick to everything except silicon (the shiny side of the release liner has a silicon coating). I don't know if Apoxie will hold up to the heat gun, you may want to give them a call and ask them or make a small sample test piece. The website says that it's not flammable, but that doesn't guarantee that it won't discolor. If it doens't hold up to the heat, you could always lay down the Apoxie Sculpt and beads after heat setting the stained glass pieces.
I'd really love to see your mosaic when you've finished. I'm curious about the Apoxie Sculpt, too. I may have to think of a good reason to buy it and play with a new technique :)
I've linked to a video below from our YouTube channel specifically regarding the mesh, and also the website of the company that creates the Apoxie Sculpt and what I read about it.
Good luck!
Carrie Strope Sohayda


Work In Progress: Peggy of PalsCreations on Etsy shared
this image of her owl in a tree done on No Days Mesh.

Hi Carrie,

 Here are the pictures of the mosaic I'm working on: a tree with a little owl in the tree. I've outlined the owl with beads that I attached to the mesh with Apoxie Sculpt; it dries hard like cement and held up fine with the heat.  It's actually going to be a baby mural for one of my teammates (I belong to piecemakers, a team on etsy) who is having a baby this year. It's a collaborative effort, we are all making separate pieces and one person is going to put it all together, I'll send you a picture when its complete. My shop name is PalsCreations.etsy.com
Thanks again,
Peggy

No Days Instructor and Support
Carrie Strope Sohayda

Hi, there! Carrie, here...

Not only do I travel the country teaching folks how to use No Days adhesives (and other techniques), but I also answer customer support emails about using No Days. So, if you're having an issue with the adhesives, chances are good that I'll be answering your questions!
 
Since I get so many good questions, I thought it might be a great learning opportunity for people that may be having some of the same issues but haven't thought to email us. Don't worry, I'll keep the emails anonymous (unless you want to share pictures and take credit or share web links to your site)!  

Also, don't forget that we've got a lot of really fabulous videos (I put those together, too...) on our YouTube channel. So for those of you who are visual learners (umm...we're visual artists, right?), you may want to check them out!

If you've got questions, feel free to contact us at info@streuter.com.

Monday, July 8, 2013

Q&A Monday ~ cracking the base of Glass On Glass mosaics

Subject: mosaic adhesive on Glass on Glass mosaics
 
After being being asked by a customer about the heat activated mosaic glue sheets, we tried them with "glass on glass" using the GNA restover restoration glass & glass tiles.  These were heated both by the heat gun & your "patented heater" & both resulted in moderate to poor adhesion with the back glass being cracked all 3 times.....  We've gone back to using the old standard "Weldbond".  Neither of these were more than 2 ft sq in surface area.  Is this a common thing?  I am reluctant to push this product after my bad luck, any suggestions?
 P


14" round Glass on Glass (GOG) mosaic created with stained glass on recycled window glass
with No Days Groutless Mosaic Adhesive. The edge of the glass base was wrapped with
zinc edge came and soldered together with wire hangers.


Hi, P~
 I'm sorry to hear that you're having problems with the adhesive on glass on glass (GOG) mosaics. Since it is a heat set adhesive, using the adhesive on larger sheets of glass can result in cracking with uneven heating. Glass can thermal shock and crack if different parts of the window are heated too quickly. I've attached a photo of one of the GOG mosaics that I've been working on lately. These are 14" round on plate glass (recycled window panes). To heat these, I bring the whole thing up to temperature in the kiln or oven before heating with a heat gun. This ensures that the glass is all the same temperature and evenly heated. In the oven, I'll set the temperature to 200 degrees and put the piece in while the oven is room temp. 10-15 minutes later, I can remove it to an insulated work surface (I use homosote board) and continue to heat with a heat gun to move my pieces into place and push down on them to ensure good contact with the plate glass below. (In the kiln, I set the temp a bit higher so I don't have to wait so long. The kiln shelves steal a lot of the heat away from the glass.)
I'm curious to know if the curing station that you're using is as big as the glass you're building on. If it is, you shouldn't be having problems. However, if it doesn't cover the whole piece of glass, then I could see it thermal shocking. Also, what kind of surface are you heating on?
I've linked to the following blog post in hopes of addressing your other issue of poor adhesion. If the pieces of glass that you're working with have lots of texture, then there may be few points of adhesion. The surface area of the pieces that are actually adhered may be too small. Also, if the base piece of glass doesn't reach 160ºF (70ºC), then that would result in pop-offs, as well.

Do you happen to have any pictures of the failures/cracked glass?
Does this help to answer any of your questions or make sense?
Let me know if it doesn't make sense.
Carrie Strope Sohayda


No Days Instructor and Support
Carrie Strope Sohayda

Hi, there! Carrie, here...

Not only do I travel the country teaching folks how to use No Days adhesives (and other techniques), but I also answer customer support emails about using No Days. So, if you're having an issue with the adhesives, chances are good that I'll be answering your questions!
Since I get so many good questions, I thought it might be a great learning opportunity for people that may be having some of the same issues but haven't thought to email us. Don't worry, I'll keep the emails anonymous!

Also, don't forget that we've got a lot of really fabulous videos (I put those together, too...) on our YouTube channel. So for those of you who are visual learners (umm...we're visual artists, right?), you may want to check them out!

If you've got questions, feel free to contact us at info@streuter.com.

Monday, June 24, 2013

Q&A Monday ~ Cleaning up Liquid Fusing Adhesive

Continuing with the theme of clean up from last week, here's an email from P. wondering how to clean the Liquid Fusing Adhesive from hands and other surfaces...

Subject: Streuter Technologies: Liquid Fusing Adhesive

What can I use to clean up tools and my hands when I get the No Days Liquid Fusing Adhesive on them?
Thanks, P
No Days Liquid Fusing Adhesive

Hi, P~
The liquid fusing adhesive is sticky stuff! When you're done using it, you can use vegetable oil or petroleum jelly to help get the adhesive off of your hands and tools, then wash with soap and warm water. If there is still a residue, acetone (nail polish remover) will help get rid of it.
Hope that helps:)
Carrie

No Days Instructor and Support
Carrie Strope Sohayda

Hi, there! Carrie, here...

Not only do I travel the country teaching folks how to use No Days adhesives (and other techniques), but I also answer customer support emails about using No Days. So, if you're having an issue with the adhesives, chances are good that I'll be answering your questions!
Since I get so many good questions, I thought it might be a great learning opportunity for people that may be having some of the same issues but haven't thought to email us. Don't worry, I'll keep the emails anonymous!

Also, don't forget that we've got a lot of really fabulous videos (I put those together, too...) on our YouTube channel. So for those of you who are visual learners (umm...we're visual artists, right?), you may want to check them out!

If you've got questions, feel free to contact us at info@streuter.com.

Monday, June 17, 2013

Q&A Monday ~ Cleaning the Needle Tip on No Days Liquid Fusing Adhesive

Subject: Streuter Technologies: How to clean needle tip?

Is there any way to clean the needle tip for use with the No Days glue? It seems to be plugged, and I can't get it to work.

Thank you for any help-
X
Tiger Lily Flower Mandala plate created with frits using No Days Liquid Fusing Adhesive
Fused Glass Frit Painting done using No Days Liquid Fusing Adhesive

Dear X ~
My first question is which No Days glue are you using? Is it the No Days Liquid Fusing Adhesive or the HoneyDoo Zuper Glue? We sell both, and I just want to make sure I'm giving you the right answer.
I'm going to assume the No Days Liquid Fusing Adhesive (LFA)...
When the LFA dries, it is super strong! It can clog the tip or glue the needle in the tip, as well. However, the LFA will soften itself. If my tip (lid) is stuck together, I'll generally turn the bottle upside down for a few seconds and then wait for a bit and try to open the tip again. Sometimes I have to use my pliers to help pry the needle out. I have broken the needle off before, though, so make sure to let it soak itself.
If you're able to take the tip off of the bottle, you can soak it in acetone (nail polish remover) or denatured alcohol for awhile and then try to unclog it.
Let me know if this helps and if I'm answering the right question:)
Good luck!
Carrie
No Days Liquid Fusing Adhesive
with needle nose applicator tip
 
Thanks, Carrie!  I finally got it unplugged- but yes, I was referring to the Liquid Fusing Adhesive.  (I did have a bottle of the HoneyDoo Zuper glue too, but that stuff totally dried up for some reason) * Anyway, I will try holding the bottle upside down and see if that works next time- but for this time, I was finally able to get it unplugged with a straight pin, working from both ends, and blowing on it.  That could have been the solution to the problem, however I think it was laying on it's side for a few minutes, so maybe that was what opened it up!
Thanks for your help- 
Best wishes!

Honey Doo Zuper Glue
HoneyDoo Zuper Glue

*The shelf life of the HoneyDoo Zuper Glue is 9-12 months. After awhile, it will dry up. You can extend the shelf life of the Zuper Glue by storing it in a refrigerated area.

No Days Instructor and Support
Carrie Strope Sohayda

Hi, there! Carrie, here...

Not only do I travel the country teaching folks how to use No Days adhesives (and other techniques), but I also answer customer support emails about using No Days. So, if you're having an issue with the adhesives, chances are good that I'll be answering your questions!

Since I get so many good questions, I thought it might be a great learning opportunity for people that may be having some of the same issues but haven't thought to email us. Don't worry, I'll keep the emails anonymous!
Also, don't forget that we've got a lot of really fabulous videos (I put those together, too...) on our YouTube channel. So for those of you who are visual learners (umm...we're visual artists, right?), you may want to check them out!

If you've got questions, feel free to contact us at info@streuter.com.

Monday, June 10, 2013

Q&A Monday ~ Mosaic Jewelry Help!

No Days Instructor and Support
Carrie Strope Sohayda

Hi, there! Carrie, here...

Not only do I travel the country teaching folks how to use No Days adhesives (and other techniques), but I also answer customer support emails about using No Days. So, if you're having an issue with the adhesives, chances are good that I'll be answering your questions!
Since I get so many good questions, I thought it might be a great learning opportunity for people that may be having some of the same issues but haven't thought to email us. Don't worry, I'll keep the emails anonymous!

Also, don't forget that we've got a lot of really fabulous videos (I put those together, too...) on our YouTube channel. So for those of you who are visual learners (umm...we're visual artists, right?), you may want to check them out!

If you've got questions, feel free to contact us at info@streuter.com.

Subject: Re: Customer needs help

Recently a customer contacted us about troubles with using No Days Mosaic Adhesive for micro mosaic jewelry...
Micro Mosaic Jewelry made using Dichroic Glass and No Days Groutless
Dichroic Dot Mosaic Jewelry using No Days Groutless Mosaic Adhesive

Hi ~
I’d like to raise my concern about the usage of  NO DAYS Mosaic Adhesive.  I have used the film – the thin one for my mosaic jewelry, and use a Black and Decker heat gun but it doesn’t work well because:
1.  It takes a long time to for the film to be melted (about 5 minutes).
2.  For small pieces, such as 1/8”, the air from the heat gun blows them away!
I haven’t used the thicker one (No Days Groutless) yet, but I think it will not be able to be melted at all because the thin one is already very difficult to use.  Since I only use small pieces for my jewelry, the NO DAYS Mosaic Adhesive seems to not work.
Thanks,
X


Dear X ~
 I followed the link you provided for the heat gun you are using. You should have no problems getting the adhesive to melt with that heat gun, whether it is on low or high. I'm curious to know what kind of pieces you are using in your jewelry. Both glass and ceramics are insulators, so it does take longer to heat them than it does to heat metal (a conductor). However, small pieces shouldn't take 5 minutes to heat. Also, when using small pieces, you'll want to start with the heat gun on low and hold it well above your work (6-8" or more) until you see the pieces shimmy. Let the adhesive melt and then it's safe to move the gun closer.

Micro Mosaic Shadowbox made using No Days Groutless Mosaic Adhesive
Micro mosaic shadowbox created with No Days Groutless
I have a video that I'm working on that shows a micro mosaic completed with Groutless Mosaic Adhesive (http://streutertechnologies.blogspot.com/2012/08/micro-mosaic-tutorial-no-days-groutless.html), but it's not quite finished.

Here is a video that shows using the groutless on small pieces. 

I also realized with your inquiry that I haven't made a video specific to jewelry yet. Many times when working with jewelry pieces and groutless (or mosaic adhesive), I'll put my pieces on a hot plate/electric skillet to heat set, avoiding the heat gun altogether. I don't have pictures of this yet, but here's a post that shows the hot plate at work with glass on glass:

Heating Glass on Glass Mosaics using No Days Mosaic Adhesive on an electric skillet
Heat setting No Days Mosaic Adhesive with an electric skillet
Let me know if you have further questions.
Hope this helps!
Carrie Strope Sohayda


Hi Carrie,
Thanks so much for replying to my email.  I think that my heat gun is broken because it’s not hot at all!  It’s even less hot than my hair dryer!  So I returned it to Amazon and asked for a replacement.
The jewelry I make is quite small – 1" to 2"; therefore, I put all the tiny pieces (including tiny glass beads) very close together, so close that you barely see a gap between them, and I use the thin adhesive film.  I am waiting for the heat gun replacement and will try again.  If it doesn’t work due to the blowing air from the heat gun, I think I will heat it from the BOTTOM of the jewelry piece which acts similarly to placing the jewelry piece on an electric skillet.
Thanks,
X
 
Great idea, X!!!  What a good suggestion for those of you trying to heat small jewelry trays with a heat gun. Try using the heat gun on the bottom of your trays to heat!

Remember, if you've got any questions about using No Days, contact me at info@streuter.com, and I'm happy to help! Got any more suggestions or questions regarding this post? Please comment below!

Monday, April 29, 2013

Q&A Monday ~ Prepping Substrate with Film Adhesive

No Days Instructor and Support
Carrie Strope Sohayda

Hi, there! Carrie, here...
Not only do I travel the country teaching folks how to use No Days adhesives (and other techniques), but I also answer customer support emails about using No Days. So, if you're having an issue with the adhesives, chances are good that I'll be answering your questions!
Since I get so many good questions, I thought it might be a great learning opportunity for people that may be having some of the same issues but haven't thought to email us. Don't worry, I'll keep the emails anonymous!
Also, don't forget that we've got a lot of really fabulous videos (I put those together, too...) on our YouTube channel. So for those of you who are visual learners (umm...we're visual artists, right?), you may want to check them out!
If you've got questions, feel free to contact us at info@streuter.com.


 Subject: Streuter Technologies: No Days Mosaic Adhesive film use
No Days Mosaic Adhesive is available in bulk rolls,
which are a great solution for studio classes
Hi, Carrie ~

I teach a little easy mosaics class and am trying to come up with a no fuss way to use your adhesive film for class. I find that when I use it in my studio... the film sheets can slide around and affect the alignment and spacing of my tesserae. Is there any way to make it easier on my students and prep the film on the substrate first. Like maybe tacking it down or just melting it slightly?

I have tried this and the film just disintegrates. I tried using the pink sheets of paper over it also...no luck.
N.
Prepping paver stones with No Days Mosaic Adhesive
Hi, N~
The film can definitely be frustrating to use if it's not set in place! I can totally relate. I've been teaching with it for a few years and have found that if you prep the substrate in advance that it makes the process so much easier. In fact, I've been doing this on every piece that I work on now. Here is a large scale project I completed with a group of k-12 students:
http://nodaysadhesives.blogspot.com/2013/01/no-days-artist-residency-in-rural.html#more

Finished mosaic panels : 9th-12th graders
102" x 36", glass & mirror mosaic

The pink paper is not release paper. Our new packaging now comes with the release paper in rolls of adhesive. The white paper (shiny side) is the release surface. It has always come with the No Days Mosaic Mesh (if you have any of that around), but we have recently started including it in the No Days Mosaic Adhesive film packages (and No Days Groutless Mosaic Adhesive), as well.
The pink paper that came in the old packages of No Days Mosaic Adhesive
is NOT release paper. It will stick to the adhesive sheets.

 To prep my substrates, I will lay down the adhesive film, then put the release paper shiny side down. I use an iron on top (the release paper prevents the adhesive from getting on the iron). It's best to cut your release paper larger than the adhesive underneath so you don't accidentally get any on your iron. (It can be cleaned off the iron by wiping it down while it's hot and then when it cools using acetone to remove any residue.) If you're working glass on glass, you can use the same technique to prep the pieces of glass, or if you've got an electric skillet (or you can use the oven ~200ºF), you can use that: http://nodaysadhesives.blogspot.com/2013/03/artist-residency-with-mosaic-glass.html

"It's hard to see in the photo, but I prepped the clear glass squares by
laying a square of No Days Mosaic Adhesive on it, and then placing
the squares on an electric skillet that I use for crafts."
If you have a bunch of the old packages of No Days Mosaic Adhesive, but need some release paper, you can contact customer service to order the silicon release paper separately.
Good luck!
Carrie
 
Hi Carrie....that is hugely helpful. Thank you for responding.
This may be my answer to offering a one day class....grouting same day!

Thanks.....fyi...love your work. Lucky for Strueter to have you.
~N.