No Days ThinFuse is a thin heat activated adhesive film that allows you
to build intricate fused glass designs in a comfortable workspace, and
then easily transport your piece to the kiln, ensuring your design stays
put. It essentially creates a
faux tack fuse, allowing you to eliminate extra firings and cut back on
the amount of time it takes to finish a multi-step fused glass project.
Once the adhesive has been heat set, you can continue to add elements
to the piece before firing in a kiln. ThinFuse is a perfect solution
for creating quick & easy fused glass mosaics.
 |
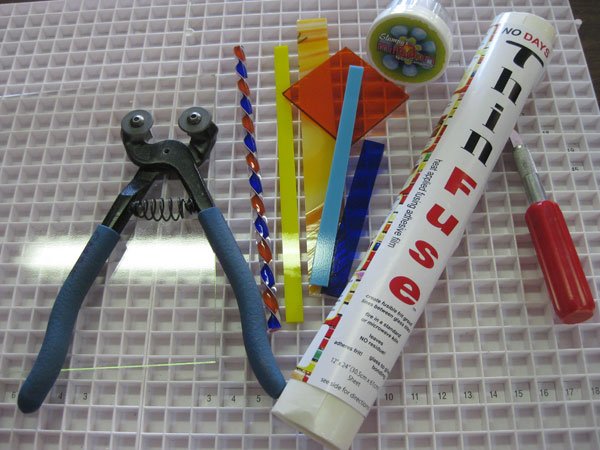
| Tools and Materials |
Materials:
- No Days ThinFuse Adhesive
- fusible Spectrum System 96 glass
- System 96 Carolina Frit
- Ryan Staub fusing cane
- No Days Liquid Fusing Adhesive
Tools:
- glass cutter, running pliers, mosaic nippers
- scissors or craft blade
- spoon, small brush
- standard heat gun, embossing tool, or conventional/toaster oven
- kiln
 |
| Cut the No Days ThinFuse to size using scissors or a craft blade |
Place
a clean base layer of fusible glass on top of a portion of ThinFuse
adhesive and release liner. There is a slight texture on the side of the
roll with the adhesive. Use a razor or scissors to cut the adhesive around the edges of the glass and return the adhesive roll to the package.
 |
| Use a spoon or other tool to burnish the adhesive against the glass base |
Turn
the glass, adhesive and release paper over. Burnish the edges and
across the center of the release paper with the back of your fingernail,
a fid, a spoon, or a pen. Rubbing on the release paper against the glass will
help the adhesive to stick and not tear when peeling back the release
paper.
 |
| Peel back the release paper low and slow |
Beginning
with a corner, peel back the separator paper, leaving the
adhesive sheet attached to the glass. Avoid pulling up on the paper as
the adhesive can tear. Instead, peel back across the glass.
 |
Don't worry if the ThinFuse tears a little - as long as the glass pieces
are larger than the hole, the glue will hold |
|
|
If you have a design that you're working from, place the pattern underneath the clear glass base and p
lace your cut glass design elements on top of the adhesive covered base layer.
 |
| Building glass around the fusing cane by Ryan Staub |
I didn't begin with a design in mind. I knew I wanted to include the colorful fusing cane from
Ryan Staub glass to add a bit of flair to my mosaic. No Days ThinFuse isn't sticky and won't adhere to the glass until it is heat set, so you're not committed to any design.
 |
| Arranging the glass pieces on top of the ThinFuse |
After heat setting the mosaic, you can still make changes to your design by re-heating and re-activating the adhesive, then removing or replacing pieces.
 |
| Heat set ThinFuse in an oven or kiln |
To
achieve a faux tack fuse, heat set the ThinFuse adhesive with a heat
gun, oven or kiln. The adhesive activates at 160 degrees F (70 degrees C). If heating
with a heat gun, make sure to heat the whole project slowly and evenly
to avoid thermal shocking the glass. Alternatively,
you can heat set the adhesive by placing the project in a toaster oven
or conventional oven set to 200 degrees F (95 degrees C) for 10 minutes. If using a kiln to heat set the adhesive, you may need to set the temperature higher (~ 300 degrees F / 150 degrees C) because the ceramic kiln shelf takes a bit longer to heat up.
After
removing the project from the heat, you will be able to nudge pieces
into place if they have moved or are not exactly where you want them.
If the pieces set up before you’re finished moving them around, simply
reheat and move the pieces into place. Let the project cool and you can
add additional elements before firing in the kiln.
 |
| Add frit by the spoonful after the ThinFuse has cooled |
For this fused glass mosaic piece, I’m adding Carolina Fine Frit for the grout lines. Spoon
some frit onto the fused glass mosaic and begin to spread it into the
grout lines.
 |
| The process of "frouting" (frit + grout = "frout") |
Use a brush to sweep the frit into place and clear off
excess frit.
 |
| Use a brush to clean up the extra frit |
While “frouting,” you can add No Days Liquid Fusing
Adhesive to help hold the frit in place, especially along the edges of
the piece. When you’ve finished grouting and sweeping off excess frit, you’re ready to transport your piece to the kiln to fire.
 |
| Secure the frit by applying No Days Liquid Fusing Adhesive |
Keeping
in mind that all kilns fire differently and that both the type and
placement of glass in the kiln will affect the firing schedule you use,
here are some sample firing schedules to get you started. It’s a good
idea to keep a journal of your firing schedules for reference so you can
change them as needed.
 |
| The fused glass mosaic ready to go in the kiln |
These firing schedules are fairly
conservative, so you shouldn't have any breakage. However, please note
that these firing schedules are just general guidelines and
recommendations made by Streuter Technologies and it is up to the user
to take into acount their glass fusing setup and design, materials used
and kiln being used to yield their desired results.
dph = degrees per hour (Fahrenheit)
AFAP = as fast as possible, represented by 9999 when programming your kiln
min = minutes
TEXTURAL TACK FUSE: This firing schedule is for textural tack fuse
and is used in creating fused glass mosaics. The fused piece will be
highly textured.
| Textural Tack Fuse |
| 300 dph | 600º F | 30 min |
| 300 dph | 1000º F | 30 min |
| 300 dph | 1100º F | 10 min |
| 50 dph | 1250º F | 20 min |
| 500 dph | 1375º F | 7 min |
| AFAP | 960º F | 90 min |
| 100 dph | 800º F | 0 min |
| 200 dph | 700º F | 0 min |
| 400 dph | 100º F | 0 min |
 |
| After a tack fuse in the kiln to keep texture |


No comments:
Post a Comment