Interested in becoming a NO Days Featured Artist?

Interested in becoming a NO Days Featured Artist?


Want to share your artwork made using NO Days products with the world? We want to help you promote your work! We love seeing the various ways artists are using NO Days products! We share our Featured Artist spotlight with our newsletter subscribers, our Facebook friends and fans, on our Featured Artist Page and right here on our blog, linking back to your website.

Simply send an email to info@nodaysadhesives.com with the subject: Featured Artist. Be sure to include your name, email address, and website (if you have one) along with a brief bio and pictures of yourself and your artwork made with NO Days Products. Not sure what to include in a bio? Tell us how you became interested in playing with glass or crafts. How about where you get your inspiration? Oh! And don't forget to tell us why you love using NO Days!
Showing posts with label video. Show all posts

Wednesday, April 16, 2014

Glass on Glass Lotus Mandala by Debbie Percelay

Debbie's mosaic based on pattern by calyxann.etsy.com

Recently, Debbie shared some pictures of the glass on glass mosaic she had been working on. Along the way, she had a few questions about different methods of heating the No Days Mosaic Adhesive. Debbie asked, "Can I put the entire piece in the oven? If so at what temp?"

Placing all the mirror and dichro dots just so...

 Yes, yes, you can! When I'm working on larger glass substrates, I put the piece in the oven at room temperature, and then set the temperature for 180º-200ºF.  While the mosaic heats up, I work on other projects around the studio/house. The adhesive goes clear and looks wet when it melts. After 10-15 minutes, I'll check back with the mosaic and test the pieces a bit using a pair of long tweezers to see if they slide easily.


"No nasty fumes? That's great! I imagine this will be much better than using my embossing gun! Should I set it straight on the oven rack?"


 Placing the mosaic straight on the rack is fine. Heating the piece in the oven gets the job done much more quickly and evenly than heating with a heat gun or embossing gun. If you're using a heat gun, you have to slowly heat the whole piece very evenly. If you don't heat a large glass substrate evenly, there's a chance of thermal shocking the glass, which results in a big crack! I have heated a larger piece with a heat gun in a pinch, but it's definitely a patience game. Using the oven (or a kiln) to heat the piece allows you to multi-task. After it's heated evenly in the oven and you remove it, you can continue to heat with your embossing tool to move pieces into place.
 
When the light reflects off of the mirror and dichro, there's tons of sparkle.

When Debbie finished her project, she shared pictures of it in the sun and in the window with backlighting. "I love it Carrie! When it's hanging in the window it's harder to see the dichro blobs and mirror, so maybe it will hang on a wall at some point. Already thinking about the next one!"

When the light is shining behind the piece, the bright, transparent colors
in the middle grab the spotlight!

Below is a video for working with No Days Mosaic Adhesive in glass on glass mosaics:

Tuesday, November 26, 2013

Making No Days Mosaic Night Lights


Tools & Materials:
  • glass base - can be a circle, square, rectangle of plate glass or stained glass (textured stained glass adds a nice look)
  • scrap glass, tiles, millefiori, etc.
  • mosaic nippers
  • circle cutting system (if you're going to cut circles, this is the easiest solution aside from buying them)
  • glass grinder
  • safety glasses
  • standard heat gun or embossing heat tool
  • long tweezers
  • night light hardware
  • sanded grout : container to mix it in, water, gloves, paper towels (You can use No Days Groutless Mosaic Adhesive to skip this step, but you may need to use a different adhesive for gluing the bail, or come up with a creative jig for holding the clip.)

    To make a No Days Mosaic Night Light, start by cutting a piece of glass for the base of your mosaic. I’m using a Toyo circle cutter with Spectrum’s System 96 clear glass, which cuts and breaks easily leaving a nice flat surface for building your mosaic on. Set the circle cutter to the radius of the circle you want to cut & center it on your glass. Make sure that there are no obstacles in the way of the bar before pressing down and scoring the glass. When you return to the start of the score, stop turning the cutter head. You only want to score once. Square off your circle, removing any excess glass.


    Next, place the breaking button from the Morton Safety Break System under the scoreline on the glass and use the running tool to push down on top of the line. Make sure you’re holding the running tool perpendicular to your score. Start your score in a corner so there’s less chance of the score running to the edge of your glass. Press with gentle but firm pressure until you see a score start to run. Rotate your glass, placing the edge of the run on top of the button and press down with the running tool again. Repeat until your score line meets itself at the other side of the circle.


    Now, score some release cuts from the edge of the glass almost to the circle score lines. Do this on four sides of the glass, then gently break the scores.


    After cutting the glass base, it’s time to get on the grinder and soften up the sharp edges of the glass so that no one gets cut picking up the night light. Using a glass grinder with water, shape the glass if needed and remove sharp edges by grinding on an angle. If you're unsure of how to do this, find a local stained glass shop and they'll show you what you need to do.


    Make sure to wear safety glasses while grinding and prevent glass bits from flying at your face with a splash guard.


    Dry the base piece of glass and cut a piece of No Days Mosaic Adhesive the size of your glass base.


    Nip various bits of glass or follow a pattern and cover your glass substrate (base). When you've got it filled in, leaving some room for grout lines, you're ready to heat set the No Days Mosaic Adhesive.


    Working on a heatproof surface, use a standard heat gun to heat the mosaic from 8-10” away, which helps to prevent the glass pieces from being blown away by the force of the hot air. As the adhesive liquefies, some of the mosaic bits may move around. While the mosaic is still hot, use your tweezers to nudge the pieces into place. If you need to add extra pieces, make sure to heat them so that they firmly adhere. Then, let the mosaic cool and assemble your grouting station.


    Gather grout, a mixing cup, water, and gloves. When your mosaic has cooled, it's ready to grout. Mix unsanded grout with a very little bit of water, adding more until you get to the consistency of toothpaste or peanut butter. Wipe the grout across the surface of your mosaic so that it gets in between all of the tiles. Pull it around the edges of the mosaic, too. Scrape the excess grout off of the surface of the mosaic, then let it sit for about 10 minutes. Using a damp sponge, wipe across the surface of the mosaic to remove the grout from on top of the tiles turning the sponge to a clean side with each pass. Again, let the mosaic sit for 10 minutes, then buff with a dry paper towel or rag to remove any haze.


    Wait another 10 minutes before gluing the night light clip to the backside of your mosaic. Cut a small length of No Days Mosaic Adhesive. Place a few layers of the adhesive film on the back of the night light where you want to attach the clip.


    Working on the heatproof surface, turn the heat gun on and have tweezers out to hold onto the clip while heating it. It’s important to heat the glass base long enough to get it hot to the touch in order to ensure a good bond. Don’t worry about your mosaic pieces falling out. The grout and adhesive should hold them firmly in place while you heat. Let your mosaic cool down, and then check to see that the clip is firmly attached. If it pulls off, then it wasn’t heated long enough. Reheat and try again, pushing excess adhesive out from between the glass base and clip.


    Attach your nightlight hardware together securely, then plug it in, turn it on and enjoy!


    For more project ideas and instructional videos, visit streuter.com.
    For ordering information or help with questions, email info@streuter.com.

Wednesday, October 2, 2013

How to Make No Days Mosaic Nightlights


Tools & Materials:
  • glass base - can be a circle, square, rectangle of plate glass or stained glass (textured stained glass adds a nice look)
  • scrap glass, tiles, millefiori, etc.
  • mosaic nippers
  • circle cutting system (if you're going to cut circles, this is the easiest solution aside from buying them)
  • glass grinder
  • safety glasses
  • No Days Mosaic Adhesive
  • standard heat gun or embossing heat tool
  • long tweezers
  • night light hardware
  • sanded grout : container to mix it in, water, gloves, paper towels (You can use No Days Groutless Mosaic Adhesive to skip this step, but you may need to use a different adhesive for gluing the bail, or come up with a creative jig for holding the clip.)

Start by cutting your base piece of glass. If you want to cut circles, here are a couple of videos to help you with that...

How to cut circles using a circle cutter:


I am using plate glass in the video above. However, plate glass can be kind of brittle. If you're having a hard time, you could try using Spectrum's System 96 clear glass; it cuts like butter!

How to cut circles using a the Morton teeny tiny circle cutter:


After you've cut your glass bases, you need to make sure that the edges aren't going to bite anyone. So, get on the grinder and soften them up. Just make sure to get rid of the sharp corners. When grinding glass, you need to use water. If you're unsure of how to do this, find a local stained glass shop and they'll show you what you need to do. They can sell you a grinder or rent you one to use in the shop. If you're really lucky, they'll let you rent it for take home use, but very few shops do this!

The short video above shows my grinder set up. I've got  Mr. Splash that lives behind my grinder to prevent splashing glass dust and water from getting everywhere. I wear safety glasses while grinding, but have often had glass bits fly at my face, so to prevent that I have a sheet of 1/4" plate glass that rests across the top of my splash guard.

Now, you're ready to start building your mosaic. Start by cutting the No Days Mosaic Adhesive to the size of your glass base. Nip various bits of glass or follow a pattern and cover your glass substrate (base). When you've got it filled, you're ready to heat set the No Days Mosaic Adhesive. Make sure you're working on a heat proof surface and that you've made sure that all melt-ables are out of the way. (This includes excess adhesive!)
Using an electric skillet to heat set glass on glass mosaics.

 If you've got an electric skillet or toaster oven, you can use those to heat set the adhesive, as well. Set the temperature to 200º F (93º C) and let them cook for 10-15 minutes.  As the adhesive liquefies, some of the mosaic bits may move around. While the mosaic is still hot, use your tweezers to nudge the pieces into place. Then, let the mosaic cool while you assemble your grouting station:
Grouting can be messy, so I like to grout outside!
Gather your grout, a mixing cup, water, and gloves. When your mosaic has cooled, it's ready to grout. Check out the video below to see the grouting process, starting at minute 4:00...


 Now, you need to glue the nightlight clip on the back of your mosaic. Cut a small length of No Days Mosaic Adhesive, about 2" x 1/4." Place the adhesive film on the back of the nightlight clip and put that on the back of your mosaic where you want it to attach.
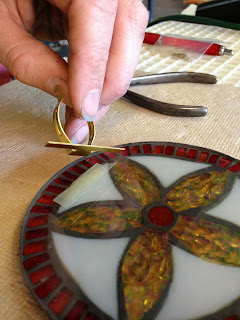
Cut a 1/4" strip of No Days Mosaic Adhesive to put under the night light clip.
Cut a 1/4" strip of No Days Mosaic Adhesive to put
under the night light clip.

Working on the heatproof surface again (I use a square homosote board. Most big box hardware stores carry this in large sizes, but some stained glass shops have this cut into smaller sizes.), turn your heat gun on and have your tweezers out to hold onto the clip while you hit it with heat. It's possible that if you heat too long, your mosaic pieces could fall out. But, I didn't have this problem. You have to heat long enough to get your glass base hot, and I stopped when the grout started to become blacker (that means the adhesive is wet). However, if you attach your clip right after grouting, you won't see this happen, because the grout is still wet.
Use tweezers to hold the clip in place while heat setting the adhesive.
Use tweezers to hold the clip in place while heat
setting the adhesive.

Again, let your mosaic cool down, so the clip is firmly attached.
Screwing on the night light clip hardware.
I prefer the screw on clip for night lights because you can
really firm up the grip on the nightlight shade.
  Then put your nightlight hardware together and your night light is ready to plug in!

No Days Mosaic Nightlight by Carrie Strope Sohayda of Calyx Glass
No Days Mosaic Nightlight by Carrie Strope Sohayda

Monday, September 23, 2013

"Looking Through Glass"


From British Council Schools Online, a look at the traditional and "modern" manufacture of glass, glass research, and its applications.
Looking Through Glass (1943) from British Council Film on Vimeo.

Thursday, July 25, 2013

Creating 3 Dimensional Mosaics with No Days Mosaic Adhesive


NO Days Mosaic Adhesive can be used on three dimensional objects with a bit of patience and creativity.  It’s great for working on several pieces at once, as you can heat set one object and move on to the next while waiting for the adhesive to cool.

For this demonstration, we’ll be using NO Days Mosaic Adhesive with a clay pot, a glass votive, and a ceramic ornament, beginning with the clay pot...

The first thing we're going to do is use our scissors to cut a strip of adhesive off of the sheet. I usually use one strip to start out. I take my pieces and layer the pieces onto my strip. I have my wedgies holding the pot so that I have a level surface


The wedgies are nice because they’re made from a non-slip, heat resistant foam, holding your project securely, and leaving your hands free. Your local stained glass studio should be able to order them for you. Once you’ve got your first row of tiles laid, it’s time to heat set the adhesive.

We're going to heat the glass and wait for the terracotta to warm up. you'll be able to see the adhesive grab onto the terracotta, it almost seeps into the terracotta when the terracotta warms up. it kind of looks like the terracotta is getting wet under the adhesive.


NO Days Mosaic Adhesive changes from a solid to a liquid at 160 degrees Fahrenheit (71 degrees C). When the adhesive is heated, it liquifies and grabs onto the pot and the glass.  You can feel the tiles glide along the surface of the pot. If the tiles don’t glide,  then the adhesive has not been heated enough.
So we're going to heat this up a little bit more, I'm going to heat underneath it. I'm not really worried about the terracotta heating up at this point. the terracotta will not break or  thermal shock. It's porous so it grabs the adhesive nicely. The trick is to let everything to completely cool before you move on to your next row. in the past I've taken a piece of mt

Then, putting a piece of masking tape...over this to keep it from sliding so if it does soften up when your heating next row it won't slide anywhere. no were going to do our next row, and for this one I'm going to cut a little bigger piece of adhesive and we're going to put in a little larger section now that we have our first section applied.

As you’re heating the next section the tiles will begin to slide, and when they do, stop heating. Move them into place with a tool if you need, and in a few seconds they will stop sliding and begin to cool. Continue to build the rest of the way around the pot in the same manner, working on sections until you reach the first section. You can grout the pot as soon as the adhesive cools.

Using the same technique and building in strips, it’s possible to mosaic a variety of surfaces with NO Days Mosaic Adhesive...next we’re using a glass votive candle holder with glass globs...
were going to take some of our globs  and set them on mixing the colors up. were going to heat the piece up. some of the pieces of glass that you find will have thicker areas around the base...thermal shock and thick bottoms, votive is small and thin, uniform so less chance for thermal shock.

 For our next project, we’ll be building on a sphere, a small ceramic ornament. This same technique can be applied at a larger scale, for example, on a bowling ball...
place adhesive on surface, preheat to shrink the adhesive onto the surface. Place globs few at a time on the surface. heat holding gun a little higher to prevent the pieces being blow away by air you can see the adhesive melting, heating glass globs and ornaments to make sure the adhesive fully adheres, you can feel it slide a little bit when it adheres.


For more ideas and instructional videos for using NO Days Mosaic Adhesive, visit http://Streuter.com.
For ordering information or help with questions, contact: info@streuter.com.


Content:
-building a mosaic on a round surface
-tips for keeping the pieces in place
-glass on glass considerations

Thursday, July 18, 2013

"The Art of Stained Glass" from 1938

I stumbled upon this old video of glass being made after visiting Dan Gamaldi's Cradle of the Sun website.
From the site where the video resides:
"The Art of Stained Glass. This is an old film made with the co-operation of James Powell and sons ( Whitefriars ) circa 1938. A video of this film was made a few years ago but it is no longer available. This video is not a copy but has been made from an original source. It has been made for the enjoyment of all lovers of Stained Glass . Regards Patrick "

Wednesday, December 7, 2011

HoneyDoo Zuper Glue for Glass Fusing...


  Glass artist, Carrie Strope Sohayda shares the process of making a fused glass art piece, "1134 Pieces." She creates intricate kilnformed glass art and utilizes HoneyDoo Zuper Glue to help her cut back on time spent loading the kiln...

"I work with glass integrating different techniques, including mosaic, kiln-formed (or fused) glass, glass painting and stained glass. I enjoy experimenting with and combining various techniques and processes, using them to add new facets to my work. I am influenced by intricate geometric designs and color exploration, incorporating a love for quilting, textiles and bright colors inherited from my mother, who was an avid quilter. I love the meditation of breaking glass into many pieces, building them together into a new form. I enjoy that kilnformed glass can be a challenge. There's always a chance for surprises and accidents. When the kiln lid closes, the glass can shift as it changes from a solid to a liquid and back. The transformative and independent nature of kiln-formed glass and its lessons of detachment have helped me evolve not only as an artist but also as a person, and makes me want to share glass as a medium with as many people as possible."

Exhibition photographs by Jenni Brant.

Wednesday, November 9, 2011

Adhering Glass Together for Fusing in a Kiln with No Days Glass Fusing Squares


No Days Glass Fusing Adhesive is a heat set adhesive that cures strong and burns off in the kiln leaving no residue.

The adhesive is available in packs of  25, 50 and 100 one inch Squares that can easily be cut to size with scissors or a razor and placed between layers of glass. 

Saturday, October 15, 2011

Building a NO Days Stained Glass Window with the Professional Fast Cure Method


The Professional Fast Cure Method using the NO Days Universal Curing Station

Using the Professional Fast Cure Method of construction with No Days Glaze pre-formed glazing strips or No Days pre-glazed lead or zinc came, you build and solder the window, and heat set the glazing with the Universal Curing Station. The No Days Universal Curing Station is available in standard sizes from 12" x 12" up to 48" x 24". Curing stations are available in custom sizes up to 8 square feet.

Preventing Stained Glass Pattern Growth with No Days Glaze


When constructing a window with No Days Glaze using the Quick Cure or Professional Fast Cure Methods, you construct your window, solder and then heat set the No Days Glaze. These methods are much quicker than the heat as you go Hobby Cure Method, but you’ll need to adjust your pattern for the added width of the No Days Glaze on either side of the heart of the lead came.

Building a Stained Glass Window with No Days Hobby Cure Method


Working with No Days Glaze - The Hobby Method


The Hobby Cure Method of construction is a great way to practice using the No Days Glaze product. It is the slowest method of construction, but does not require adjusting the stained glass pattern for the width of the No Days Glazing material.


With the Hobby Cure Method, the window is assembled, heated, and cured piece by piece.


Constructing a small project with the hobby cure method allows you to see how long it will take to melt the No Days Glaze with the heat gun, as well as letting you adjust to using the heat gun.


First, insert the NO Days Glaze into a lead or zinc channel and cut to size. You may need to use a tool to help the glaze into the channel of your lead or zinc came.

Ordering, Sizing and Securing No Days Glaze for Stained Glass


No Days Glaze by Streuter Technologies are pre-formed glazing strips made for use in the construction of leaded or zinc stained glass windows. 


No Days Glaze comes in rolls of 25 ft, 50 ft, 100 ft and 250 ft.
and in three colors: black, clear and pewter.

Introduction to No Days Glaze for Building a Stained Glass Window


No Days Glaze by Streuter Technologies are pre-formed glazing strips made for use in the construction of leaded or zinc stained glass windows. 


No Days Glaze has several advantages over the traditional putty method. Our glaze is designed to be inserted into the lead or zinc channel before the glass. This adds a step during construction, but eliminates the tedious and messy process of traditional putty or cement glazing methods, in effect saving you hours, and sometimes days, that you would be waiting for the putty to set before installation of the window. 

Primer for Using No Days BailBond Adhesive for Jewelry and Other Findings


Beginning to Use No Days BailBond

When you first begin to use No Days BailBond, you may be frustrated by a bail that won’t stay where you put it. As the heat set adhesive turns to liquid, the bail may slide along the surface. 

To help keep your pendant, BailBond and bail in place before the adhesive sets, you can use a bit of painter’s tape to hold the pieces together. While you’re still getting used to working with No Days BailBond, there is a greater chance of overheating with this technique, because you can’t see the adhesive or feel when the adhesive bonds with the bail and the pendant. This means a bit more clean up, but it’s still simple. 

Attaching a Cabochon to Purse Hanger with No Days Bailbond


Adhering a Fused Glass Cabochon to a Purse Hanger Finding Using No Days BailBond


No Days BailBond is versatile and works well with a number of different findings. For this video, I’ll demonstrate how easy it is to use BailBond to attach a cabochon to a purse hanger finding.

Using a Soldering Iron to Attach a Bail to a Pendant with No Days BailBond


Heating No Days BailBond using a Soldering Iron

No Days BailBond is a heat set adhesive that is quick and easy to use. By heat setting with a battery powered portable electronics soldering iron:
  • You’re able to feel when the NO Days BailBond is beginning to adhere. 
  • You can pinpoint the heat exactly where you need it. 
  • It’s portable and easy to use at a show, where you may not have access to electricity.

Attach And Wear Your Jewelry Quickly with No Days BailBond Adhesive


Attach and Wear Instantly!

No Days Bail Bond allows you to attach a bail or finding to your jewelry and wear it instantly because as soon as it cools, it’s cured.


Begin by cutting a piece of BailBond just slightly longer than your bail. As it’s heated the BailBond will pull in and fill any gaps. Make a sandwich with the bail, BailBond and pendant.