Interested in becoming a NO Days Featured Artist?

Interested in becoming a NO Days Featured Artist?


Want to share your artwork made using NO Days products with the world? We want to help you promote your work! We love seeing the various ways artists are using NO Days products! We share our Featured Artist spotlight with our newsletter subscribers, our Facebook friends and fans, on our Featured Artist Page and right here on our blog, linking back to your website.

Simply send an email to info@nodaysadhesives.com with the subject: Featured Artist. Be sure to include your name, email address, and website (if you have one) along with a brief bio and pictures of yourself and your artwork made with NO Days Products. Not sure what to include in a bio? Tell us how you became interested in playing with glass or crafts. How about where you get your inspiration? Oh! And don't forget to tell us why you love using NO Days!
Showing posts with label tutorial. Show all posts

Saturday, January 30, 2016

No Days QStik Adhesive = Mosaic Wallpaper

What is No Days Q Stik Mosaic Adhesive?


  One side of the No Days Q Stik Mosaic Adhesive utilizes the advantages of No Days' heat activated adhesive for tile placement, while the back side of the Q Stik film contains an industrial strength, quick stick mounting adhesive for permanent mounting of your mosaic to a wide variety of large or small  interior surfaces, both horizontally and vertically.  It's basically, a customizable mosaic wallpaper. So, how do you use it?


Begin by cutting the Q Stik to size, then cut and place your mosaic tiles on the waxy side of the Q Stik. After all or part of your tiles are in place, use a heat gun or heat embossing tool to activate the heat set adhesive. Grab a pair of tweezers to move the tiles into place before they cool and bond to the Q Stik paper. (If they cool and you can't move them, you can always reheat them to re-position the tiles.)


When the adhesive and tiles have cooled down, the bond will be permanent (unless you decide to heat the tiles up to 160 degrees F / 70 degrees C), and you're ready to install. Peel back the paper the covers the pressure sensitive adhesive and press into place.


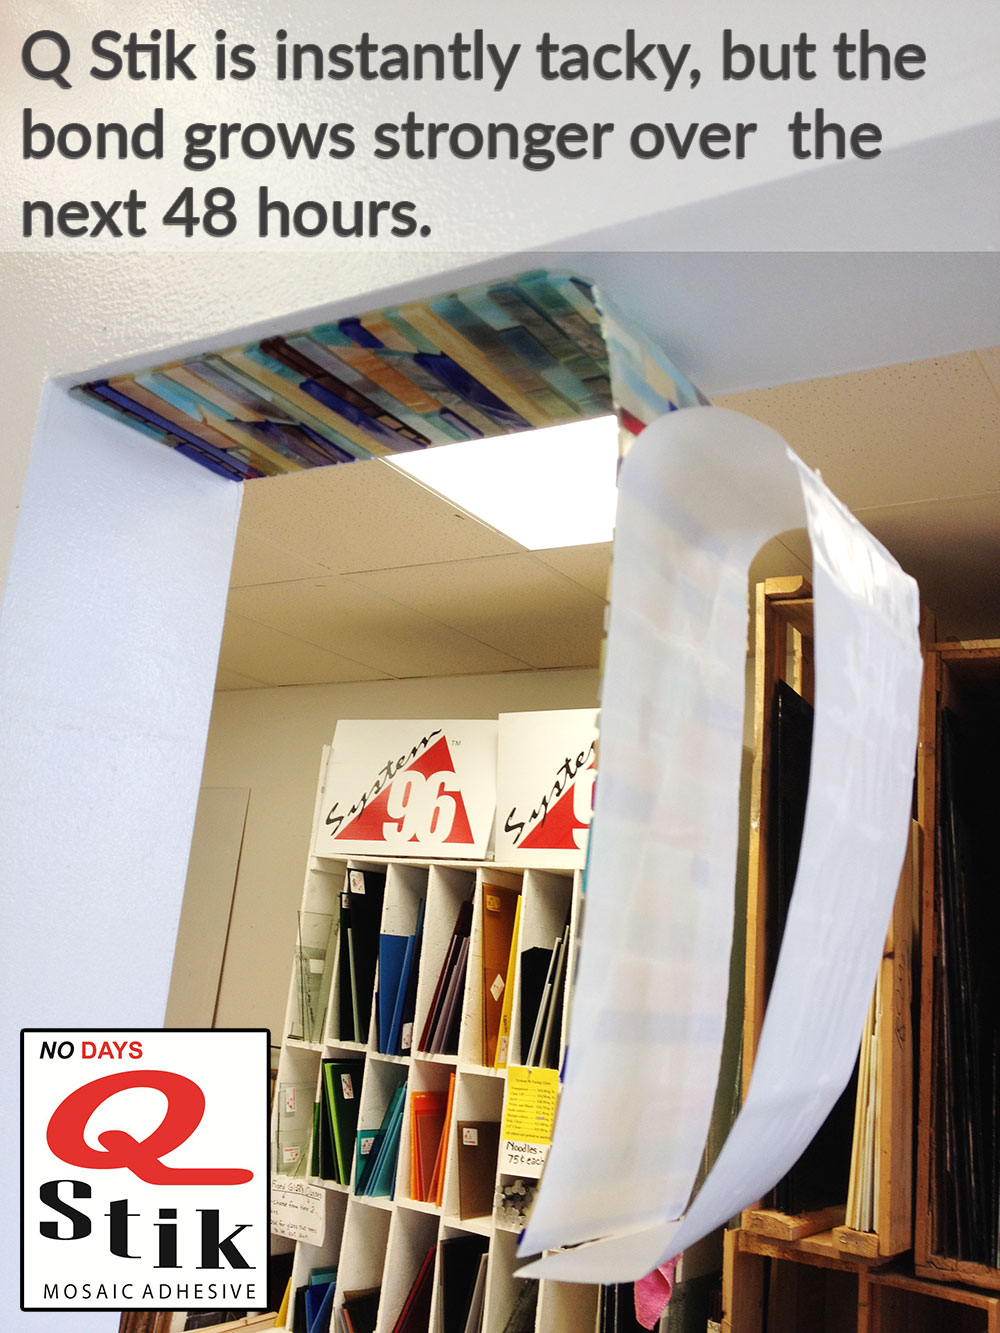
Depending upon where you're planning on installing the mosaic, you may need to support the adhesive for awhile before the permanent bond takes over. In the pictures, I've installed the mosaic upside down on an archway to see how well the QStik sticks. It's installed over some glossy paint in a strip roughly 6" x 18".


This was the last project on my to do list before leaving the studio, so I taped it to help keep it in place (just in case the adhesive needs some help sticking while it's curing). When I get back to the studio, I'll finish by grouting and then report back in intervals to let you know how well my mosaic wallpaper is sticking...


Wednesday, May 21, 2014

Q & A ~ Heating No Days Mosaic Mesh in the Oven

Assorted tiles on No Days Mosaic Mesh:
thick dichroic on ceramic tiles, clay tile, thick glass tile,
smalti & fused glass
No Days Mosaic Mesh is a fiberglass mesh with No Days Mosaic Adhesive embedded in it. So, instead of using white glue (which can be messy) or thinset or mortar (which can be messy and take time to mix up in small batches), you can place your tiles on top of the mesh and heat set them in place before final installation with a cement product.

The No Days Mosaic Adhesive will stick to everything but silicone. So, it comes packaged with a silicone coated paper to be used as a release liner. If you don't heat set your tiles on the mesh on top of the silicone release liner, then the mesh will stick to whatever surface is lying under it!
 
Assorted tiles on No Days Mosaic Mesh:
glass tiles, sea shell & smalti
 Once your tiles are in place, you can use a standard heat gun, curing station, embossing heat tool, oven, electric skillet, or toaster oven to heat the adhesive to activate it. Using an oven can be a huge time saver, because it frees up your hands to continue working on more sections of the mosaic instead of holding a heat gun.  The No Days Adhesive is non-toxic and will not contaminate your oven when used properly.

Assorted tiles on No Days Mosaic Mesh:
thick and thin glass tile,  stone & dichroic glass
To use an oven, find a cookie sheet and line it with the release liner from the NO Days Mosaic Mesh packaging. The liner should be slightly larger than the mesh mosaic you are building. Then, lay down a section of No Days Mosaic Mesh and cover it with your tiles. When you're ready to heat set the adhesive, put the cookie sheet in the oven and set the oven to 180º-200ºF (80º-90ºC). Leave your mosaic in the oven for approximately 10 minutes. After 10 minutes, remove the cookie sheet and use tweezers or a skewer to move pieces into place if they are not exactly where they should be. You will have about a minute to move your tiles around before the adhesive begins to cool and cure. If you need more time, then reheat the mosaic. (NOTE: If you continue to move the tiles when the adhesive begins to cool and cure, then your bond will become weak. Reheat the pieces to reactivate the adhesive if you need more time.)


If you haven't tried using No Days Mosaic Mesh, it's recommended to try building a small section (~6" or 12") to get used to the way it works. After you heat set the piece and pull it out of the oven,  let it cool down.  Shake the mesh a bit and if the pieces are falling off, then the try to heat again.
 
Some things to keep in mind: 
  • Thicker tiles can take a bit longer to heat. Experiment to see how long you need to heat your tiles. The adhesive activates at 160ºF (70ºC), which is too hot to touch. You should not be able to comfortably touch tiles that are hot enough to activate the adhesive. 
  • No Days Adhesives do not stick to silicon. If your tiles had any kind of silicon adhesive covering the back of them, they will not stick to the mesh because our adhesive won't stick to silicon. 
  • If you have any problems, please contact info@streuter.com so we can help you sort them out!

Thursday, October 17, 2013

Layered Dichroic Glass Jewelry Project Sheet

To download the pdf, visit Streuter's project gallery.
  Fusing scrap bits of dichroic glass together in layers can create jewelry with depth and an aura of mystery. Use this project sheet or the accompanying video below to walk you through the process.

Approximate time to complete project = 2 hours


Monday, October 7, 2013

No Days Photo Mosaic Coaster

To download the pdf, visit Streuter's project gallery.
  This photo mosaic coaster makes a great project as a gift for a parent, grandparents, aunts, uncles and other family members. It's super easy, and if you eliminate the spacing between the pieces, you could skip the grouting to make for a quicker project. The No Days Mosaic Adhesive helps to water proof the photograph and coaster.

Approximate time to complete project = 1 to 1-1/2 hours


Wednesday, October 2, 2013

How to Make No Days Mosaic Nightlights


Tools & Materials:
  • glass base - can be a circle, square, rectangle of plate glass or stained glass (textured stained glass adds a nice look)
  • scrap glass, tiles, millefiori, etc.
  • mosaic nippers
  • circle cutting system (if you're going to cut circles, this is the easiest solution aside from buying them)
  • glass grinder
  • safety glasses
  • No Days Mosaic Adhesive
  • standard heat gun or embossing heat tool
  • long tweezers
  • night light hardware
  • sanded grout : container to mix it in, water, gloves, paper towels (You can use No Days Groutless Mosaic Adhesive to skip this step, but you may need to use a different adhesive for gluing the bail, or come up with a creative jig for holding the clip.)

Start by cutting your base piece of glass. If you want to cut circles, here are a couple of videos to help you with that...

How to cut circles using a circle cutter:


I am using plate glass in the video above. However, plate glass can be kind of brittle. If you're having a hard time, you could try using Spectrum's System 96 clear glass; it cuts like butter!

How to cut circles using a the Morton teeny tiny circle cutter:


After you've cut your glass bases, you need to make sure that the edges aren't going to bite anyone. So, get on the grinder and soften them up. Just make sure to get rid of the sharp corners. When grinding glass, you need to use water. If you're unsure of how to do this, find a local stained glass shop and they'll show you what you need to do. They can sell you a grinder or rent you one to use in the shop. If you're really lucky, they'll let you rent it for take home use, but very few shops do this!

The short video above shows my grinder set up. I've got  Mr. Splash that lives behind my grinder to prevent splashing glass dust and water from getting everywhere. I wear safety glasses while grinding, but have often had glass bits fly at my face, so to prevent that I have a sheet of 1/4" plate glass that rests across the top of my splash guard.

Now, you're ready to start building your mosaic. Start by cutting the No Days Mosaic Adhesive to the size of your glass base. Nip various bits of glass or follow a pattern and cover your glass substrate (base). When you've got it filled, you're ready to heat set the No Days Mosaic Adhesive. Make sure you're working on a heat proof surface and that you've made sure that all melt-ables are out of the way. (This includes excess adhesive!)
Using an electric skillet to heat set glass on glass mosaics.

 If you've got an electric skillet or toaster oven, you can use those to heat set the adhesive, as well. Set the temperature to 200º F (93º C) and let them cook for 10-15 minutes.  As the adhesive liquefies, some of the mosaic bits may move around. While the mosaic is still hot, use your tweezers to nudge the pieces into place. Then, let the mosaic cool while you assemble your grouting station:
Grouting can be messy, so I like to grout outside!
Gather your grout, a mixing cup, water, and gloves. When your mosaic has cooled, it's ready to grout. Check out the video below to see the grouting process, starting at minute 4:00...


 Now, you need to glue the nightlight clip on the back of your mosaic. Cut a small length of No Days Mosaic Adhesive, about 2" x 1/4." Place the adhesive film on the back of the nightlight clip and put that on the back of your mosaic where you want it to attach.
Cut a 1/4" strip of No Days Mosaic Adhesive to put under the night light clip.
Cut a 1/4" strip of No Days Mosaic Adhesive to put
under the night light clip.

Working on the heatproof surface again (I use a square homosote board. Most big box hardware stores carry this in large sizes, but some stained glass shops have this cut into smaller sizes.), turn your heat gun on and have your tweezers out to hold onto the clip while you hit it with heat. It's possible that if you heat too long, your mosaic pieces could fall out. But, I didn't have this problem. You have to heat long enough to get your glass base hot, and I stopped when the grout started to become blacker (that means the adhesive is wet). However, if you attach your clip right after grouting, you won't see this happen, because the grout is still wet.
Use tweezers to hold the clip in place while heat setting the adhesive.
Use tweezers to hold the clip in place while heat
setting the adhesive.

Again, let your mosaic cool down, so the clip is firmly attached.
Screwing on the night light clip hardware.
I prefer the screw on clip for night lights because you can
really firm up the grip on the nightlight shade.
  Then put your nightlight hardware together and your night light is ready to plug in!

No Days Mosaic Nightlight by Carrie Strope Sohayda of Calyx Glass
No Days Mosaic Nightlight by Carrie Strope Sohayda

Wednesday, September 18, 2013

Instagram ~ a quick primer...

Username: streutertech on Instagram. Come find us!


So, by now, you've likely heard of Instagram, right? But, do you know how to use it or what it's for? It's a photo sharing social network, where you can share your life, your art, your kids, your dog, your food, and whatever else floats your boat (yeah, you can share your boat, too!) in photos. Not only does Instagram let you take photos with your fancy phone, but it lets you add funky filters to your sweet photos so you can make them look decades old! Talk about technology moving forward, huh?

Photo of my garden from the 70s? Well, the filter and prayer flags certainly
help make it look like it!
Seriously, though, I LOVE  Instagram! It's a great way to connect with people without wasting too much time on the "computer" (think Facebook). You can view and comment on photos from your computer, but Instagram is really meant to be used on your phone. So, if you're busy in the workshop, but you want to show off your latest project, you just snap a pic and share!

Putting together more color samples, so I can decide which frits
I want to use in my #fused #glass #mosaic
It's a nice way to get a little social interaction while I work in my studio...all alone. You can't even imagine how many conversations I have throughout the day, though! And with folks from all over the world! (Well, actually, you could probably see my conversations, if you look through all of my photos.) So, for this primer, I'm going to assume that you know how to pick a filter...that's pretty straight forward, right?

After you take or select a photo, this is the
screen that you'll see in Instagram.
Okay, okay...really quick, then...The little squares along the bottom of the screen are the various filters you can choose for your photo. My current favorites are Amaro, Mayfair and Rise. The little icon on the far right that looks like a sun is the auto contrast/brightness button. Pick this and your photo POPS!...sometimes a little too much! No worries, hit it again and your photo reverts to normal. The teardrop icon is the blur filter. I rarely use this. If your photo is cluttered, I suppose this could help to focus attention. There are a few different selections available. You can blur the outside edges of your photo, you can blur the top and bottom of your photo, or you can leave it unblurred. The next icon to the left (blue in the photo above) is a frame. You can add a frame to your photo as long as you have a filter added. Each filter has its own frame. Finally, the next little icon (new!) lets you rotate your photo. Play around with photos and have fun, then get ready for the tidbits below that will help you connect with other Instagram users!

Insta-faux-tack fuse on the #lotus #fused #glass sconce-to-be using No Days ThinFuse

Mmm-kay...so you're posting photos of what you're doing. Now, how do you find other people with your interests to follow? The search function allows you to search usernames (good if you know who you're looking for) and hastags...umm...what? Yeah, that's what I thought a few years ago when husband was trying to explain "The Twitter" to me. Hashtags are how you categorize your photos with keywords for people to find. A hashtag is preceded by the pound sign (#).
Are you having a productive day? I'm finishing up UFOs
(unfinished objects)
#mosaic #flower #dichroic

So, for example, while working on a birdbath project a few weeks ago using No Days Groutless Mosaic Adhesive, I posted the following pictures. (Honestly, I posted 17 pictures of the whole process!) Instead of just hash-tagging the heck out of the photo, I told folks what I was up to and added the hashtags at the end.
Time to call it a day. The sunlight's disappearing.
#groutless
#mosaic #hypertufa #birdbath experiment
You can fit your hashtags into your description as part of your sentence, as well. For example, this photo I took of an in progress mandala mosaic:
Today's rainy day #mosaic project ~
modified the pattern on my
#lotus #mandala to make cutting easier.
But, I can't resist the urge to cut more tiny pieces!
 While you're posting photos, you may find that you have new followers and likes. These will show up as notifications on your Instagram feed:
Cute little fused glass monster from glassidesign
that showed up in my newsfeed.
The heart icon at the bottom of the picture above shows my notifications= likes, comments and follows. The camera icon lets me take a photo. The star icon lets me search for usernames or hashtags. The house is my Homepage/newsfeed. The icon at the far right is my instagram feed with all my photos.
Social me!

Above is a photo that got some lovin'! First, you can see all the likes next to the little heart under the photo. Then, you'll see the conversation bubble below. My comment comes first. Then, if other people comment, the comments show up next. I get notifications whenever anybody comments, but unlike other social networks, other people don't get notified if I comment back. So to talk to other people that have commented, I need to make sure to @ them. If I start to type the @ sign, then instagram will automatically pop up a list of folks I can interact with. I'm pretty sure I can only interact with folks that follow me, or I follow, or if they've commented. Pretty sure.


So, that's the lowdown on Instagram. Get it now? Get out there and take some photos! Hashtag 'em up! Make some new friends! Oh, and find streutertech on Instagram so we can interact, too :)

Monday, September 16, 2013

Fused Glass Snowflake Ornament Project Sheet

To download the pdf, visit Streuter's project gallery.
  With the holidays around the corner, you may be looking for projects to make as gifts. The HoneyDoo Zuper Glue Snowflake Ornament is a quick project that doesn't take much time or glass, but gets lots of oohs and aahs when the wrapping paper comes off!

Approximate time to complete project = 1/2 hour


Friday, August 16, 2013

No Days Mosaic Coaster Project Sheet

To download the pdf, visit Streuter's project gallery.
The No Days Mosaic Coaster makes a great scouting or birthday party project for kids. If you want to eliminate the grouting process, clean up is faster and easier. Just space your tiles really close together before setting.

Approximate time to complete project = 1 to 1-1/2 hours


Thursday, July 25, 2013

Creating 3 Dimensional Mosaics with No Days Mosaic Adhesive


NO Days Mosaic Adhesive can be used on three dimensional objects with a bit of patience and creativity.  It’s great for working on several pieces at once, as you can heat set one object and move on to the next while waiting for the adhesive to cool.

For this demonstration, we’ll be using NO Days Mosaic Adhesive with a clay pot, a glass votive, and a ceramic ornament, beginning with the clay pot...

The first thing we're going to do is use our scissors to cut a strip of adhesive off of the sheet. I usually use one strip to start out. I take my pieces and layer the pieces onto my strip. I have my wedgies holding the pot so that I have a level surface


The wedgies are nice because they’re made from a non-slip, heat resistant foam, holding your project securely, and leaving your hands free. Your local stained glass studio should be able to order them for you. Once you’ve got your first row of tiles laid, it’s time to heat set the adhesive.

We're going to heat the glass and wait for the terracotta to warm up. you'll be able to see the adhesive grab onto the terracotta, it almost seeps into the terracotta when the terracotta warms up. it kind of looks like the terracotta is getting wet under the adhesive.


NO Days Mosaic Adhesive changes from a solid to a liquid at 160 degrees Fahrenheit (71 degrees C). When the adhesive is heated, it liquifies and grabs onto the pot and the glass.  You can feel the tiles glide along the surface of the pot. If the tiles don’t glide,  then the adhesive has not been heated enough.
So we're going to heat this up a little bit more, I'm going to heat underneath it. I'm not really worried about the terracotta heating up at this point. the terracotta will not break or  thermal shock. It's porous so it grabs the adhesive nicely. The trick is to let everything to completely cool before you move on to your next row. in the past I've taken a piece of mt

Then, putting a piece of masking tape...over this to keep it from sliding so if it does soften up when your heating next row it won't slide anywhere. no were going to do our next row, and for this one I'm going to cut a little bigger piece of adhesive and we're going to put in a little larger section now that we have our first section applied.

As you’re heating the next section the tiles will begin to slide, and when they do, stop heating. Move them into place with a tool if you need, and in a few seconds they will stop sliding and begin to cool. Continue to build the rest of the way around the pot in the same manner, working on sections until you reach the first section. You can grout the pot as soon as the adhesive cools.

Using the same technique and building in strips, it’s possible to mosaic a variety of surfaces with NO Days Mosaic Adhesive...next we’re using a glass votive candle holder with glass globs...
were going to take some of our globs  and set them on mixing the colors up. were going to heat the piece up. some of the pieces of glass that you find will have thicker areas around the base...thermal shock and thick bottoms, votive is small and thin, uniform so less chance for thermal shock.

 For our next project, we’ll be building on a sphere, a small ceramic ornament. This same technique can be applied at a larger scale, for example, on a bowling ball...
place adhesive on surface, preheat to shrink the adhesive onto the surface. Place globs few at a time on the surface. heat holding gun a little higher to prevent the pieces being blow away by air you can see the adhesive melting, heating glass globs and ornaments to make sure the adhesive fully adheres, you can feel it slide a little bit when it adheres.


For more ideas and instructional videos for using NO Days Mosaic Adhesive, visit http://Streuter.com.
For ordering information or help with questions, contact: info@streuter.com.


Content:
-building a mosaic on a round surface
-tips for keeping the pieces in place
-glass on glass considerations

Tuesday, July 16, 2013

No Days Stepping Stone Project Sheet

To download the pdf, visit Streuter's project gallery.
 Add some more color to your yard by making some garden art using paving stones and No Days Mosaic Adhesive. This stepping stone project doesn't take overnight to complete. If you've got access to an oven for heat setting the non-toxic adhesive, it makes the project even easier! Check out the video below for a walk through of the process...

Approximate time to complete project = 3 hours

Thursday, July 11, 2013

Playing with No Days Groutless Mosaic Adhesive

  Whenever using a new technique or new product,  I always like to start small. This gives me the chance to play around without getting too attached to the outcome and gives me an indication of whether or not my ideas will work in the selected medium. That's why I have a bunch of 1/4" mdf coaster substrates cut to four inches.
Cutting No Days Groutless Mosaic Adhesive with an exacto razor.
If you're new to using the No Days Groutless Mosaic Adhesive, I would definitely suggest a play date. Gather your tools and materials and get started:
  • coaster substrate (can be mdf or even ceramic tiles from the hardware store)
  • some trinkets, beads and glass or ceramic tiles
  • glass cutting tools (mosaic nippers, glass scorer, running pliers, safety glasses)
  • heat gun or embossing heat tool
  • scissors or craft blade
  • long heat proof tool to move the pieces around while heating (tweezers, screwdriver, craft blade, etc.)

Placing glass tiles on the coaster substrate.
After cutting the Groutless Mosaic Adhesive to the size of your coaster substrate, you can start adding tiles and bits on top. NOTE: You don't have to be exact on cutting the Groutless. It's okay if it's a little large or a little small. Also, you may want to try layering the Groutless Mosaic Adhesive in areas to see the varying effects it creates. (The Groutess Mosaic Adhesive comes in sheets that are not tacky. You can cut the sheets and stack them on top of each other before laying tiles on top of them.)
Heat the Groutless Mosaic Adhesive to set the pieces.
After you've covered the adhesive, it's time to heat set it. I call the Groutless Mosaic Adhesive a "participatory adhesive" (totally made up technical term). You really need to get in there and work with it as you're heating. As it begins to liquify, some of your pieces may start to shift and move around. It's okay, that's supposed to happen, at first! If your pieces start sliding around and things are getting out of control, then turn off the heat gun and set it aside for a moment. Glass and ceramic are insulators, so they'll hold the heat for awhile allowing you to move them into place. When the pieces are in the right spot, you need to push down on them to make the excess adhesive (causing the tiles to swim) press out from underneath the tiles and rise up around the outside edges of the tiles (to act as the grout). If the tiles stop moving, or the adhesive starts to wrinkle or ripple as you move your tiles, grab that heat gun and start heating again.
Completed sample tile in less than 30 minutes.
Once you've heated, moved and pressed on your tiles, you need to let the mosaic cool down. If you've been a good date and heated the glass or ceramic thoroughly, then it's going to take a bit longer for the mosaic to cool down. Use this time to start another sample and switch things up a bit! See how far you can push your ideas. NOTE: I forgot to mention that sometimes the Groutless Mosaic Adhesive will shrink up while you're heating, exposing the surface underneath. Don't panic! Use your tool to push on the tiles, using them to move the adhesive around and cover up any bald spots.
Create several samples tiles to create a larger mosaic of mosaics!
Once you've created tiles, try building on a glass surface. Keep it small (~4-6") and don't forget to keep your heat gun moving. Larger pieces of glass can thermal shock when heated unevenly. For more on glass on glass mosaics using Groutless Mosaic Adhesive, check out this post.

For those of you who are visual learners and need to see the process, check out the video below:

Wednesday, June 12, 2013

Mosaic Welcome Letter Project Sheet

To download the pdf, visit Streuter's project gallery.
Looking for a quick, fun, summer time project? Using No Days Mosaic Adhesive, you can quickly heat set the glass glob pieces in this mosaic project. As soon as the pieces cool, you're ready to grout! (If you grout outside in the grass, clean up is super easy!)

Approximate time to complete project = 1 to 1-1/2 hours


Friday, May 17, 2013

Groutless Micro Mosaic Jewelry Project Sheet

To download the pdf, visit Streuter's project gallery.
 Using No Days Groutless Mosaic Adhesive, you can create finished micro mosaic jewelry in no time at all and eliminate the mess and trouble of grouting to boot! The video below is an introduction to using No Days Groutless...

Approximate time to complete project = 1 hour


Tuesday, April 23, 2013

Undersea Gardens Tutorial


Carrie Strope Sohayda ~ "Undersea Gardens" 12" x 6"
Materials:
  • 1/4 lb 96 Fusing Canes Alternating 3 Red 2 Aqua Inner Helix
  • 1/4 lb 96 Fusing Canes Green 5 Line Inner Helix
  • 1/4 lb 96 Fusing Canes Cobalt 5 Line Inner Helix
  • Spectrum System 96 Dark Blue Transparent
  • Spectrum System 96 Clear
  • Spectrum System 96 Cherry Red Transparent
  • Spectrum System 96 Medium Green Transparent
  • Spectrum System 96 Deep Aqua Transparent
  • Slumpy's SM-6130 Ripple Swoop Mold
  • HoneyDoo Zuper Glue 
Tools:
  • Mosaic Nippers
  • Fine Tip Sharpie
  • Ruler
  • Glass Cutter
  • Running Pliers
  • Safety Glasses
  • Kiln
  • Papyros Shelf Paper
  • Kilnwashed Kiln Furniture
1. Begin by cutting glass and nipping cane.
•Cut two 2” x 12” and two 1½” x 12” pieces of clear glass.
•Cut two 1½” x 12” pieces of dark blue glass.
•Cut two ⅜” x 12” strips each of dark blue, cherry red, medium green, and deep aqua.
•Mark fusing cane at 2” lengths. Using mosaic nippers, cut fusing canes in each color to 2.”

2. Layout pieces according to the pattern below.
•For the first layer, lay down the smaller piece of clear glass in the middle. On either side, place the
strips of glass on edge, and then lay down the  dark blue pieces of glass to the outside.
•For the second layer, place the two remaining pieces of clear glass on top of the dark blue, and lay the cane out across the clear piece in the middle, securing the outer pieces with a dab of glue.

TIP: If you build on a piece of cardboard, you can easily transport and load the pieces into the kiln.

3. Full fuse & then slump.

Pattern Alterations: •To eliminate strips, add ½” to
the width of the dark blue and clear rectangles.
•To avoid using kiln furniture or fiber paper dams,
cut two ½” x 2” pieces of dark blue & clear to hold
the fusing cane in the middle section.
FIRING TIPS:
•To prevent the fusing cane from shifting off of the base layer of glass while firing, use kiln dams
against the ends. If you don’t have dams or fiber paper, you can alter the pattern using the above
instructions.
•If you want to eliminate bubbles from between the canes, space the canes so that there is a little
wiggle room between the pieces.


Suggested full fuse firing schedule:

200 dph to 1000ºF hold for 45 min
50 dph to 1250ºF hold for 25 min
500 dph to 1450ºF hold for 45 min
full to 1000ºF with no hold
200 dph to 950ºF hold for 60 min
100 dph to 800ºF with no hold
300 dph to 120ºF  with no hold

NOTE: This is a fairly conservative firing schedule, but you may need to make changes based on your kiln.

Friday, March 22, 2013

Groutless Letter Mosaic Project Sheet

To download the pdf, visit Streuter's project gallery.
Using No Days Groutless Mosaic Adhesive to create mosaics cuts down on the messiest part of the process leaving you with a finished mosaic in no time at all. Create custom letters to hang on your wall or decorate a child's room with whimsy!

Approximate time to complete project = 1 hour


Thursday, February 7, 2013

No Days Doodle Plate Project Sheet

To download the pdf, visit Streuter's project gallery.
Detail of 'Tiger Lily' by Calyx Glass
   The Doodle Plate is created using a sheet of clear fusible glass, Carolina frit, No Days Liquid Fusing Adhesive, Glassline pens and a pattern template. By designing on both sides of the clear glass, you can add a lot of depth and interest to your piece and make it look much more complicated than it actually is!

Tuesday, August 21, 2012

Creating Fused Glass Mosaics ~ A Tutorial

No Days ThinFuse is a thin heat activated adhesive film that allows you to build intricate fused glass designs in a comfortable workspace, and then easily transport your piece to the kiln, ensuring your design stays put. It essentially creates a faux tack fuse, allowing you to eliminate extra firings and cut back on the amount of time it takes to finish a multi-step fused glass project.  Once the adhesive has been heat set, you can continue to add elements to the piece before firing in a kiln.  ThinFuse is a perfect solution for creating quick & easy fused glass mosaics.
Tools and Materials
Materials:
  • No Days ThinFuse Adhesive
  • fusible Spectrum System 96 glass
  • System 96 Carolina Frit
  • Ryan Staub fusing cane
  • No Days Liquid Fusing Adhesive
Tools:
  • glass cutter, running pliers, mosaic nippers
  • scissors or craft blade
  • spoon, small brush
  • standard heat gun, embossing tool, or conventional/toaster oven
  • kiln

Monday, August 6, 2012

Micro Mosaic Tutorial - No Days Groutless Adhesive


No Days Groutless Micro Mosaic Tutorial

No Days Groutless Mosaic Adhesive quickly secures glass, ceramic and stone tiles to substrates and fills in grout lines during heating. It's a one step glue and grout process that works perfectly with the Micro Mosaic process.

With all the tiny tiles, you want to make sure that you're not covering a large surface, unless you don't mind having projects sit for awhile :) The shadowbox I filled for this tutorial is 5" x 7" and it took approximately 5 hours to cut the tiles and assemble the pieces. You can save yourself some time by buying pre-cut tiles.