Tools & Materials:
- glass base - can be a circle, square, rectangle of plate glass or stained glass (textured stained glass adds a nice look)
- scrap glass, tiles, millefiori, etc.
- mosaic nippers
- circle cutting system (if you're going to cut circles, this is the easiest solution aside from buying them)
- glass grinder
- safety glasses
- No Days Mosaic Adhesive
- standard heat gun or embossing heat tool
- long tweezers
- night light hardware
- sanded grout : container to mix it in, water, gloves, paper towels (You can use No Days Groutless Mosaic Adhesive to skip this step, but you may need to use a different adhesive for gluing the bail, or come up with a creative jig for holding the clip.)
Start by cutting your base piece of glass. If you want to cut circles, here are a couple of videos to help you with that...
How to cut circles using a circle cutter:
I am using plate glass in the video above. However, plate glass can be kind of brittle. If you're having a hard time, you could try using Spectrum's System 96 clear glass; it cuts like butter!
How to cut circles using a the Morton teeny tiny circle cutter:
After you've cut your glass bases, you need to make sure that the edges aren't going to bite anyone. So, get on the grinder and soften them up. Just make sure to get rid of the sharp corners. When grinding glass, you need to use water. If you're unsure of how to do this, find a local stained glass shop and they'll show you what you need to do. They can sell you a grinder or rent you one to use in the shop. If you're really lucky, they'll let you rent it for take home use, but very few shops do this!
The short video above shows my grinder set up. I've got Mr. Splash that lives behind my grinder to prevent splashing glass dust and water from getting everywhere. I wear safety glasses while grinding, but have often had glass bits fly at my face, so to prevent that I have a sheet of 1/4" plate glass that rests across the top of my splash guard.
Now, you're ready to start building your mosaic. Start by cutting the No Days Mosaic Adhesive to the size of your glass base. Nip various bits of glass or follow a pattern and cover your glass substrate (base). When you've got it filled, you're ready to heat set the No Days Mosaic Adhesive. Make sure you're working on a heat proof surface and that you've made sure that all melt-ables are out of the way. (This includes excess adhesive!)
 |
| Using an electric skillet to heat set glass on glass mosaics. |
If you've got an electric skillet or toaster oven, you can use those to heat set the adhesive, as well. Set the temperature to 200º F (93º C) and let them cook for 10-15 minutes. As the adhesive liquefies, some of the mosaic bits may move around. While the mosaic is still hot, use your tweezers to nudge the pieces into place. Then, let the mosaic cool while you assemble your grouting station:
 |
| Grouting can be messy, so I like to grout outside! |
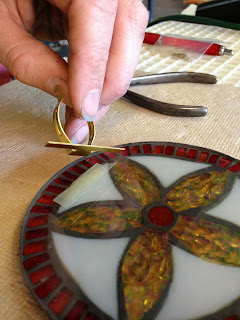
Now, you need to glue the nightlight clip on the back of your mosaic. Cut a small length of No Days Mosaic Adhesive, about 2" x 1/4." Place the adhesive film on the back of the nightlight clip and put that on the back of your mosaic where you want it to attach.
 |
| Cut a 1/4" strip of No Days Mosaic Adhesive to put under the night light clip. |
Working on the heatproof surface again (I use a square homosote board. Most big box hardware stores carry this in large sizes, but some stained glass shops have this cut into smaller sizes.), turn your heat gun on and have your tweezers out to hold onto the clip while you hit it with heat. It's possible that if you heat too long, your mosaic pieces could fall out. But, I didn't have this problem. You have to heat long enough to get your glass base hot, and I stopped when the grout started to become blacker (that means the adhesive is wet). However, if you attach your clip right after grouting, you won't see this happen, because the grout is still wet.
 |
| Use tweezers to hold the clip in place while heat setting the adhesive. |
Again, let your mosaic cool down, so the clip is firmly attached.
 |
| I prefer the screw on clip for night lights because you can really firm up the grip on the nightlight shade. |
Then put your nightlight hardware together and your night light is ready to plug in!
 |
| No Days Mosaic Nightlight by Carrie Strope Sohayda |
No comments:
Post a Comment