Interested in becoming a NO Days Featured Artist?

Interested in becoming a NO Days Featured Artist?


Want to share your artwork made using NO Days products with the world? We want to help you promote your work! We love seeing the various ways artists are using NO Days products! We share our Featured Artist spotlight with our newsletter subscribers, our Facebook friends and fans, on our Featured Artist Page and right here on our blog, linking back to your website.

Simply send an email to info@nodaysadhesives.com with the subject: Featured Artist. Be sure to include your name, email address, and website (if you have one) along with a brief bio and pictures of yourself and your artwork made with NO Days Products. Not sure what to include in a bio? Tell us how you became interested in playing with glass or crafts. How about where you get your inspiration? Oh! And don't forget to tell us why you love using NO Days!
Showing posts with label GOG. Show all posts

Friday, July 11, 2014

Artist Spotlight ~ Trish Rossiter of TR Mosaics

Trish Rossiter of TR Mosaics (now Meraki Mosaics)

Trish is a self taught, mainly glass on glass (GOG) mosaic artist of about 6 years. “ I love using tiny pieces of stained glass in my mosaics and was thrilled to try No Days Mosaic Adhesive film and loved how this piece turned out! :) Definitely using this adhesive for my next project!”

Trish says, "I used the No Days Mosaic Adhesive for the rocks,
as well as the glass and it worked perfectly!"

"It was love at first sight when I spied a mosaic window hanging
inside a (yummy :) bakery in Almonte, Ontario a few years ago.
Simple, yet beautiful, I  imagined the mosaic hanging in my garden.

Just up the street from the bakery was a neat little shop filled with
mosaics for sale. I was like a kid in candy store!  Alas, the cost of
my favorite piece was beyond my means. I was so inspired however, I
immediately decided that I would try my hand at this ancient art.


It was the perfect time to tap into my creative side. Being a sleep
deprived mom, working on a master’s thesis had left me stressed to the
max and chipping glass quickly became my escape from reality!


Fast forward several years … boy where did that time go! And what have
I actually done with my life since? Well, I've retired from my nursing
career and I have thankfully cut my stress level to a quarter of what
it was…  I am a happier and more “present” mom to our kids. Inspired
by the beauty all around me - usually my children, pets or nature - I
continue to love the challenge of capturing that beauty in my glass on
glass mosaics. I recently started a Meetup group for Mosaic-ers in my
community and am thrilled to mosaic regularly with like minded
artists! 


Wednesday, April 16, 2014

Glass on Glass Lotus Mandala by Debbie Percelay

Debbie's mosaic based on pattern by calyxann.etsy.com

Recently, Debbie shared some pictures of the glass on glass mosaic she had been working on. Along the way, she had a few questions about different methods of heating the No Days Mosaic Adhesive. Debbie asked, "Can I put the entire piece in the oven? If so at what temp?"

Placing all the mirror and dichro dots just so...

 Yes, yes, you can! When I'm working on larger glass substrates, I put the piece in the oven at room temperature, and then set the temperature for 180º-200ºF.  While the mosaic heats up, I work on other projects around the studio/house. The adhesive goes clear and looks wet when it melts. After 10-15 minutes, I'll check back with the mosaic and test the pieces a bit using a pair of long tweezers to see if they slide easily.


"No nasty fumes? That's great! I imagine this will be much better than using my embossing gun! Should I set it straight on the oven rack?"


 Placing the mosaic straight on the rack is fine. Heating the piece in the oven gets the job done much more quickly and evenly than heating with a heat gun or embossing gun. If you're using a heat gun, you have to slowly heat the whole piece very evenly. If you don't heat a large glass substrate evenly, there's a chance of thermal shocking the glass, which results in a big crack! I have heated a larger piece with a heat gun in a pinch, but it's definitely a patience game. Using the oven (or a kiln) to heat the piece allows you to multi-task. After it's heated evenly in the oven and you remove it, you can continue to heat with your embossing tool to move pieces into place.
 
When the light reflects off of the mirror and dichro, there's tons of sparkle.

When Debbie finished her project, she shared pictures of it in the sun and in the window with backlighting. "I love it Carrie! When it's hanging in the window it's harder to see the dichro blobs and mirror, so maybe it will hang on a wall at some point. Already thinking about the next one!"

When the light is shining behind the piece, the bright, transparent colors
in the middle grab the spotlight!

Below is a video for working with No Days Mosaic Adhesive in glass on glass mosaics:

Tuesday, November 26, 2013

Making No Days Mosaic Night Lights


Tools & Materials:
  • glass base - can be a circle, square, rectangle of plate glass or stained glass (textured stained glass adds a nice look)
  • scrap glass, tiles, millefiori, etc.
  • mosaic nippers
  • circle cutting system (if you're going to cut circles, this is the easiest solution aside from buying them)
  • glass grinder
  • safety glasses
  • standard heat gun or embossing heat tool
  • long tweezers
  • night light hardware
  • sanded grout : container to mix it in, water, gloves, paper towels (You can use No Days Groutless Mosaic Adhesive to skip this step, but you may need to use a different adhesive for gluing the bail, or come up with a creative jig for holding the clip.)

    To make a No Days Mosaic Night Light, start by cutting a piece of glass for the base of your mosaic. I’m using a Toyo circle cutter with Spectrum’s System 96 clear glass, which cuts and breaks easily leaving a nice flat surface for building your mosaic on. Set the circle cutter to the radius of the circle you want to cut & center it on your glass. Make sure that there are no obstacles in the way of the bar before pressing down and scoring the glass. When you return to the start of the score, stop turning the cutter head. You only want to score once. Square off your circle, removing any excess glass.


    Next, place the breaking button from the Morton Safety Break System under the scoreline on the glass and use the running tool to push down on top of the line. Make sure you’re holding the running tool perpendicular to your score. Start your score in a corner so there’s less chance of the score running to the edge of your glass. Press with gentle but firm pressure until you see a score start to run. Rotate your glass, placing the edge of the run on top of the button and press down with the running tool again. Repeat until your score line meets itself at the other side of the circle.


    Now, score some release cuts from the edge of the glass almost to the circle score lines. Do this on four sides of the glass, then gently break the scores.


    After cutting the glass base, it’s time to get on the grinder and soften up the sharp edges of the glass so that no one gets cut picking up the night light. Using a glass grinder with water, shape the glass if needed and remove sharp edges by grinding on an angle. If you're unsure of how to do this, find a local stained glass shop and they'll show you what you need to do.


    Make sure to wear safety glasses while grinding and prevent glass bits from flying at your face with a splash guard.


    Dry the base piece of glass and cut a piece of No Days Mosaic Adhesive the size of your glass base.


    Nip various bits of glass or follow a pattern and cover your glass substrate (base). When you've got it filled in, leaving some room for grout lines, you're ready to heat set the No Days Mosaic Adhesive.


    Working on a heatproof surface, use a standard heat gun to heat the mosaic from 8-10” away, which helps to prevent the glass pieces from being blown away by the force of the hot air. As the adhesive liquefies, some of the mosaic bits may move around. While the mosaic is still hot, use your tweezers to nudge the pieces into place. If you need to add extra pieces, make sure to heat them so that they firmly adhere. Then, let the mosaic cool and assemble your grouting station.


    Gather grout, a mixing cup, water, and gloves. When your mosaic has cooled, it's ready to grout. Mix unsanded grout with a very little bit of water, adding more until you get to the consistency of toothpaste or peanut butter. Wipe the grout across the surface of your mosaic so that it gets in between all of the tiles. Pull it around the edges of the mosaic, too. Scrape the excess grout off of the surface of the mosaic, then let it sit for about 10 minutes. Using a damp sponge, wipe across the surface of the mosaic to remove the grout from on top of the tiles turning the sponge to a clean side with each pass. Again, let the mosaic sit for 10 minutes, then buff with a dry paper towel or rag to remove any haze.


    Wait another 10 minutes before gluing the night light clip to the backside of your mosaic. Cut a small length of No Days Mosaic Adhesive. Place a few layers of the adhesive film on the back of the night light where you want to attach the clip.


    Working on the heatproof surface, turn the heat gun on and have tweezers out to hold onto the clip while heating it. It’s important to heat the glass base long enough to get it hot to the touch in order to ensure a good bond. Don’t worry about your mosaic pieces falling out. The grout and adhesive should hold them firmly in place while you heat. Let your mosaic cool down, and then check to see that the clip is firmly attached. If it pulls off, then it wasn’t heated long enough. Reheat and try again, pushing excess adhesive out from between the glass base and clip.


    Attach your nightlight hardware together securely, then plug it in, turn it on and enjoy!


    For more project ideas and instructional videos, visit streuter.com.
    For ordering information or help with questions, email info@streuter.com.

Wednesday, October 2, 2013

How to Make No Days Mosaic Nightlights


Tools & Materials:
  • glass base - can be a circle, square, rectangle of plate glass or stained glass (textured stained glass adds a nice look)
  • scrap glass, tiles, millefiori, etc.
  • mosaic nippers
  • circle cutting system (if you're going to cut circles, this is the easiest solution aside from buying them)
  • glass grinder
  • safety glasses
  • No Days Mosaic Adhesive
  • standard heat gun or embossing heat tool
  • long tweezers
  • night light hardware
  • sanded grout : container to mix it in, water, gloves, paper towels (You can use No Days Groutless Mosaic Adhesive to skip this step, but you may need to use a different adhesive for gluing the bail, or come up with a creative jig for holding the clip.)

Start by cutting your base piece of glass. If you want to cut circles, here are a couple of videos to help you with that...

How to cut circles using a circle cutter:


I am using plate glass in the video above. However, plate glass can be kind of brittle. If you're having a hard time, you could try using Spectrum's System 96 clear glass; it cuts like butter!

How to cut circles using a the Morton teeny tiny circle cutter:


After you've cut your glass bases, you need to make sure that the edges aren't going to bite anyone. So, get on the grinder and soften them up. Just make sure to get rid of the sharp corners. When grinding glass, you need to use water. If you're unsure of how to do this, find a local stained glass shop and they'll show you what you need to do. They can sell you a grinder or rent you one to use in the shop. If you're really lucky, they'll let you rent it for take home use, but very few shops do this!

The short video above shows my grinder set up. I've got  Mr. Splash that lives behind my grinder to prevent splashing glass dust and water from getting everywhere. I wear safety glasses while grinding, but have often had glass bits fly at my face, so to prevent that I have a sheet of 1/4" plate glass that rests across the top of my splash guard.

Now, you're ready to start building your mosaic. Start by cutting the No Days Mosaic Adhesive to the size of your glass base. Nip various bits of glass or follow a pattern and cover your glass substrate (base). When you've got it filled, you're ready to heat set the No Days Mosaic Adhesive. Make sure you're working on a heat proof surface and that you've made sure that all melt-ables are out of the way. (This includes excess adhesive!)
Using an electric skillet to heat set glass on glass mosaics.

 If you've got an electric skillet or toaster oven, you can use those to heat set the adhesive, as well. Set the temperature to 200º F (93º C) and let them cook for 10-15 minutes.  As the adhesive liquefies, some of the mosaic bits may move around. While the mosaic is still hot, use your tweezers to nudge the pieces into place. Then, let the mosaic cool while you assemble your grouting station:
Grouting can be messy, so I like to grout outside!
Gather your grout, a mixing cup, water, and gloves. When your mosaic has cooled, it's ready to grout. Check out the video below to see the grouting process, starting at minute 4:00...


 Now, you need to glue the nightlight clip on the back of your mosaic. Cut a small length of No Days Mosaic Adhesive, about 2" x 1/4." Place the adhesive film on the back of the nightlight clip and put that on the back of your mosaic where you want it to attach.
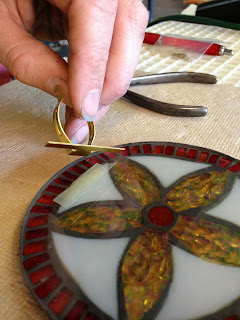
Cut a 1/4" strip of No Days Mosaic Adhesive to put under the night light clip.
Cut a 1/4" strip of No Days Mosaic Adhesive to put
under the night light clip.

Working on the heatproof surface again (I use a square homosote board. Most big box hardware stores carry this in large sizes, but some stained glass shops have this cut into smaller sizes.), turn your heat gun on and have your tweezers out to hold onto the clip while you hit it with heat. It's possible that if you heat too long, your mosaic pieces could fall out. But, I didn't have this problem. You have to heat long enough to get your glass base hot, and I stopped when the grout started to become blacker (that means the adhesive is wet). However, if you attach your clip right after grouting, you won't see this happen, because the grout is still wet.
Use tweezers to hold the clip in place while heat setting the adhesive.
Use tweezers to hold the clip in place while heat
setting the adhesive.

Again, let your mosaic cool down, so the clip is firmly attached.
Screwing on the night light clip hardware.
I prefer the screw on clip for night lights because you can
really firm up the grip on the nightlight shade.
  Then put your nightlight hardware together and your night light is ready to plug in!

No Days Mosaic Nightlight by Carrie Strope Sohayda of Calyx Glass
No Days Mosaic Nightlight by Carrie Strope Sohayda

Friday, September 6, 2013

Tips & Tricks ~ No Days Mosaic Adhesive on a Glass Tabletop

Donna's Poolside Hibiscus Mosaic Tabletop
 Occasionally, we get asked if it's okay to use No Days Mosaic Adhesive on large glass tabletops.  I've never really been sure if it would work or not, due to the fact that you have to heat the glass to 160ºF (71ºC) to get the pieces to adhere properly. When heating large pieces of glass, there's a possibility of thermal shocking and shattering the glass, if it's not heated evenly across the entire surface of the glass.

 However, we received these amazing photos of a hibiscus mosaic tabletop completed by Donna using No Days Mosaic Adhesive film and stained glass on a tempered glass tabletop.

"I made this mosaic hibiscus table using NO Days Mosaic Adhesive Film.  I covered the entire glass table with the film, placed my glass on the top of the film and heated both the top and underside of the table with a heat gun.  It worked great!!!  If I needed to move something, I just reheated that area and moved it. The table was made with tempered glass, I think that’s why it didn’t break.  I have also turned the table completely upside down, and it all held together."

Thanks for sharing, Donna!

We love seeing pictures of pieces made using No Days adhesives. If you've got something you've made that you'd like to share, please email us at: info@streuter.com.

Monday, July 8, 2013

Q&A Monday ~ cracking the base of Glass On Glass mosaics

Subject: mosaic adhesive on Glass on Glass mosaics
 
After being being asked by a customer about the heat activated mosaic glue sheets, we tried them with "glass on glass" using the GNA restover restoration glass & glass tiles.  These were heated both by the heat gun & your "patented heater" & both resulted in moderate to poor adhesion with the back glass being cracked all 3 times.....  We've gone back to using the old standard "Weldbond".  Neither of these were more than 2 ft sq in surface area.  Is this a common thing?  I am reluctant to push this product after my bad luck, any suggestions?
 P


14" round Glass on Glass (GOG) mosaic created with stained glass on recycled window glass
with No Days Groutless Mosaic Adhesive. The edge of the glass base was wrapped with
zinc edge came and soldered together with wire hangers.


Hi, P~
 I'm sorry to hear that you're having problems with the adhesive on glass on glass (GOG) mosaics. Since it is a heat set adhesive, using the adhesive on larger sheets of glass can result in cracking with uneven heating. Glass can thermal shock and crack if different parts of the window are heated too quickly. I've attached a photo of one of the GOG mosaics that I've been working on lately. These are 14" round on plate glass (recycled window panes). To heat these, I bring the whole thing up to temperature in the kiln or oven before heating with a heat gun. This ensures that the glass is all the same temperature and evenly heated. In the oven, I'll set the temperature to 200 degrees and put the piece in while the oven is room temp. 10-15 minutes later, I can remove it to an insulated work surface (I use homosote board) and continue to heat with a heat gun to move my pieces into place and push down on them to ensure good contact with the plate glass below. (In the kiln, I set the temp a bit higher so I don't have to wait so long. The kiln shelves steal a lot of the heat away from the glass.)
I'm curious to know if the curing station that you're using is as big as the glass you're building on. If it is, you shouldn't be having problems. However, if it doesn't cover the whole piece of glass, then I could see it thermal shocking. Also, what kind of surface are you heating on?
I've linked to the following blog post in hopes of addressing your other issue of poor adhesion. If the pieces of glass that you're working with have lots of texture, then there may be few points of adhesion. The surface area of the pieces that are actually adhered may be too small. Also, if the base piece of glass doesn't reach 160ºF (70ºC), then that would result in pop-offs, as well.

Do you happen to have any pictures of the failures/cracked glass?
Does this help to answer any of your questions or make sense?
Let me know if it doesn't make sense.
Carrie Strope Sohayda


No Days Instructor and Support
Carrie Strope Sohayda

Hi, there! Carrie, here...

Not only do I travel the country teaching folks how to use No Days adhesives (and other techniques), but I also answer customer support emails about using No Days. So, if you're having an issue with the adhesives, chances are good that I'll be answering your questions!
Since I get so many good questions, I thought it might be a great learning opportunity for people that may be having some of the same issues but haven't thought to email us. Don't worry, I'll keep the emails anonymous!

Also, don't forget that we've got a lot of really fabulous videos (I put those together, too...) on our YouTube channel. So for those of you who are visual learners (umm...we're visual artists, right?), you may want to check them out!

If you've got questions, feel free to contact us at info@streuter.com.

Tuesday, May 21, 2013

The Low Down for Glass on Glass Mosaics with No Days

Streuter Technologies offers several different adhesive solutions for mosaic artists. Each one was developed for a specific use. So how do you know which one you should use? This post will hopefully help you to answer that question, specifically for Glass on Glass mosaics.

How do you decide which adhesive to use?


Now for the nitty-gritty...and lots of pictures for explanations:
No Days Mosaic Adhesive film
The stained glass looking window above was created using the No Days Mosaic Adhesive film. No Days Mosaic Adhesive Film is dry-to-the-touch and comes in rolls of thin, film sheets that can be cut to size. It comes in "clear," which has a yellowish tint to it.
The base of the mosaic is a clear piece of hammered stained glass. Even though one side is "flat," there is still texture to the flat side, additionally, the stained glass pieces that I cut to shape and laid down on top also have texture to them. What does this mean?

Thursday, March 14, 2013

Artist Residency with Mosaic Glass Quilts

In December, artist Carrie Strope Sohayda of Calyx Glass spent one week with K-5th grade art students at Clinton Elementary School in Lincoln, Nebraska. In addition to creating fused glass snowflakes for the students to take home and enjoy, they also collaborated on a glass quilt that will hang in the school for all the students, staff and visitors to enjoy for years to come.
Pre-installation picture of the six 18" x 24" panels
  Before diving in to containers of glass, she walked the students through the design process with worksheets that helped the students figure out the quilt blocks they would use, what shapes made up the blocks, and playing with different color combinations using different color schemes, color theory, and the color wheel.
3 Patch Design Worksheet
for the K-2nd Graders
4 Patch Design Worksheet
for the 3rd-5th Graders
After getting the worksheets colored in, each student chose the color combination they liked best and got to carefully pick through the glass bins to find the perfect pieces for their mosaic. Each student got a 4" square of recycled window glass (their "substrate") that was prepped ahead of time with No Days Mosaic Adhesive. "It was an incredibly clean process to work with. I didn't have to deal with sticky fingers and students asking to wash their hands. I also didn't have to wait for the individual quilt blocks to dry before taking them home to assemble into panels," noted Carrie.
"It's hard to see in the photo, but I prepped the clear glass squares by
laying a square of No Days Mosaic Adhesive on it, and then placing
the squares on an electric skillet that I use for crafts."


The No Days Mosaic Adhesive is transparent so the students placed their clear glass squares upon their templates to guide them in placing the "tesserae," or pieces of colored glass. Once they were happy with how their quilt blocks looked, they brought them over to the "curing station" - an electric skillet that activated the heat set adhesive,  where Miss Carrie made any adjustments in placement that the students pointed out.
In the classroom, gluing down the pieces
with a electric skillet and No Days Mosaic Adhesive.
At the end of each class period, the finished blocks were stacked and set aside in a box. At the end of the last day when all the quilt blocks were built, Carrie took them home to mount on 18" x 24" plexiglass panels with a silicon adhesive. Each panel then sat for 48 hours (while the silicone cured) before being grouted.

After assembling all the squares and gluing them on plexiglass,
the panels were grouted.
The International Quilt Study Center is located in Lincoln, Nebraska in the same neighborhood as Clinton Elementary School and will be displaying the Mosaic Glass Quilt panels for their First Friday event in May, 2013.

 For more information, check out the Lincoln Arts Council announcement, here.


Monday, December 5, 2011

Creating Glass on Glass Mosaics with NO Days Mosaic Adhesive


Glass on Glass with No Days Mosaic Adhesive

Using NO Days Mosaic Adhesive to create glass on glass mosaics is a quick and easy way to finish a stained glass window without having to worry about lead or solder.


Begin by cutting all of your glass pieces to fit your pattern.


Place the NO Days Mosaic Adhesive on your glass substrate, cut to size and begin building your mosaic. When all of your glass pieces are in place, you’re ready to heat set the adhesive.