 |
| No Days Groutless Micro Mosaic Tutorial |
No Days Groutless Mosaic Adhesive quickly secures glass, ceramic and stone tiles to substrates and fills in grout lines during heating. It's a one step glue and grout process that works perfectly with the Micro Mosaic process.
With all the tiny tiles, you want to make sure that you're not covering a large surface, unless you don't mind having projects sit for awhile :) The shadowbox I filled for this tutorial is 5" x 7" and it took approximately 5 hours to cut the tiles and assemble the pieces. You can save yourself some time by buying pre-cut tiles.
| Tools and Materials: | |
|
|
 |
| Use mosaic nippers to cut small tiles even smaller |
Begin by drawing or tracing your pattern onto your substrate so you have reference lines to work from. I found an image of some ancient Roman mosaics from the Roman Mosaic Workshops page on Facebook. I really liked the center knot in the mosaic, so I drew out my design on the wooden substrate and began in the center.
 |
| Work in small sections to prevent your tiny tiles from getting knocked around |
It's best to work in small sections when you're working with so many teeny, tiny pieces. Cut the No Days Groutless Mosaic Adhesive to cover a small section that you want to work on and begin placing the tiles that you've cut and nipped. After covering a small section, it's time to heat set the adhesive to hold the tiles in place.
 |
| Heat slowly with a heat gun and move the tiles while hot |
Using a standard heat gun or embossing heat tool, turn the heat on low and begin to heat the tiles and adhesive from 6"-8" above the piece. IMPORTANT: Do not hold the heating tool too close to the mosaic when you begin heating. All those little pieces will get blown away by the force of the hot air. Instead, move the heat gun slowly closer to the mosaic as the adhesive begins to liquify. Use tweezers or other heat proof tool to push down on the tiles, moving them into place and setting them into the adhesive. As you're heating, the No Days Groutless may pull back in areas that are exposed (not covered with tiles). Use a tile or a flat head screwdriver to "paint" the adhesive over the bald spots.
 |
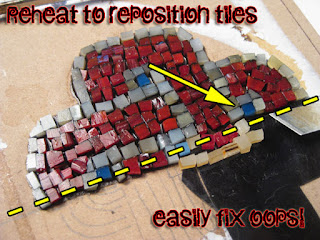
| No Days Groutless Mosaic Adhesive makes it easy to fix mistakes |
If you happen to make a design mistake and want to fix it, you can reheat the tiles to reposition them. I inadvertently got off center with my design, so I had to move the blue tile and a couple of cream colored tiles down. If you're using tiles that are larger or are leaving more of a gap in between the tiles, you may want to layer and overlap the No Days Groutless Mosaic Adhesive sheets. This will allow the adhesive to rise up more to surround the tiles.
Once you're happy with the placement of the tiles, the process is
finished! There's no grouting!
 |
| No Days Groutless Micro Mosaic Shadowbox |

Very helpful video for those who want to make mosaic products...It is really a big help for me toward your side.
ReplyDelete