Interested in becoming a NO Days Featured Artist?

Interested in becoming a NO Days Featured Artist?


Want to share your artwork made using NO Days products with the world? We want to help you promote your work! We love seeing the various ways artists are using NO Days products! We share our Featured Artist spotlight with our newsletter subscribers, our Facebook friends and fans, on our Featured Artist Page and right here on our blog, linking back to your website.

Simply send an email to info@nodaysadhesives.com with the subject: Featured Artist. Be sure to include your name, email address, and website (if you have one) along with a brief bio and pictures of yourself and your artwork made with NO Days Products. Not sure what to include in a bio? Tell us how you became interested in playing with glass or crafts. How about where you get your inspiration? Oh! And don't forget to tell us why you love using NO Days!

Monday, October 28, 2013

No Days Road Show ~ Stained Glass Design - Mount Dora, Florida

The front window of Rosemarie's shop, Stained Glass Design.
Rosemarie's Glamor Shot, modeling bags of Slumpy's Carolina Frit!
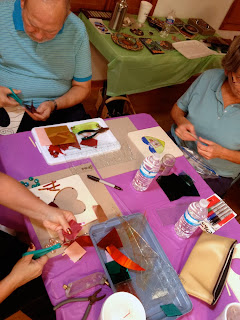
Getting started on glueFOIL mosaics...One of my favorite things
about classes is seeing all of the different ideas and designs that
everyone comes up with. Everyone's got such a unique style!


Heat setting the glueFOIL mosaic picture frames.
We're using ceiling tiles to heat on, which fume a bit (hence the mask in the middle).
The No Days doesn't fume or off-gas. It's non-toxic!
Student pieces...on the left, a dragonfly glueFOIL mosaic;
on the right, a gorgeous autumn tree on No Days Mosaic Mesh.


Student pieces...on the right, an abstract, geometric glueFOIL mosaic;
on the left, an abstract design on No Days Mosaic Mesh.

Heat setting the mesh mosaics in class.
Students took their mosaics home to mount them with mortar.

Heat setting the mesh mosaics in class.
Students took their mosaics home to mount them with mortar.

Getting ready for some fun with No Days Mosaic Mesh! Can you tell?

Piecing together stained glass on mesh.

Talking designs and getting inspired by the glass.

Finished student designs on No Days Mosaic Mesh.
Definitely an artistic bunch, pushing the limits of mosaics!


Wednesday, October 23, 2013

Linda's No Days Mosaics

Linda's beautiful garden bench
We love it when you share your projects with us! It's so inspiring to see the creativity that all of our No Days family members (that's you!) possess. Here are some photos that Linda shared with us...

Linda's Gorgeous Groutless Mosaic Upcycled Chair
"I used  No Days Mosaic Adhesive on this project. I use it on almost all my projects. I have also used the Groutless Mosaic Adhesive. I like taking old things and making them look beautiful. I am going to attach a few other pictures to show you. The chair I am sending you was made with the Groutless because I felt grout would not last in that area." 
Linda's Mosaic Mailbox
"I love doing glass on glass. I still have not been able to keep bubbles from showing, but when I use the right glass very little shows. I am not able to put my glass on glass in the oven because of the size of the pieces. I have seen the work of others that you have put online and I think mine is so simple compared to some you have shown. I learned how to do stained glass more than 35 years ago. I then raised a family and had a teaching job.  I just retired last year and went to the stepping stone class. I have found something that I love to do again!"  
Linda's Lovely stained glass mosaic recycled window
"Because of No Days Mosaic Adhesive I have tried so many things. There really isn't much more room in my house, I will have to start making things for others! I have decided if I can not sell things, people will start getting them as gifts... I'm not going to stop trying to make things better...Oh, use any picture you like, all was made with No Days Mosaic Adhesive." ~Linda
Linda's wonderful woodland window
Check out more of Linda's creations at Garlin Stained Glass on Facebook!

Monday, October 21, 2013

Q&A Monday ~ Mosaic Mesh vs film adhesive

Subject: Exterior Mosaic project
I am working on a large 3' x 6' exterior glass tile mosaic. I thought I'd adhere it to backer board, working flat, then mount that to the wall for final placement. I was thinking of using your No Days Mesh, as I position the tiles. Then use Weldbond glue to adhere it to the backer board. Grout and seal. Now I am wondering if I should just use your Mosaic Adhesive Film. Would that product work on what will be hung vertically and be outdoors permanently?
Thanks for your help.
L

Thank you! Looking forward to using this. How long has this product been available?

Should I use No Days Mosaic film or Mosaic Mesh?

Hi, L :)
The mesh was meant to be mounted with mortar or thinset. I would suggest using the No Days Mosaic Adhesive Film if you'll be working directly on backerboard and then mounting. The adhesive only activates (or reactivates) at 160 degrees F, which is well above outdoor temperatures. The freeze thaw cycle doesn't affect it either.
Hope this helps. Let me know if you have further questions!
Carrie


No Days Instructor and Support
Carrie Strope Sohayda

Hi, there! Carrie, here...

Not only do I travel the country teaching folks how to use No Days adhesives (and other techniques), but I also answer customer support emails about using No Days. So, if you're having an issue with the adhesives, chances are good that I'll be answering your questions!
Since I get so many good questions, I thought it might be a great learning opportunity for people that may be having some of the same issues but haven't thought to email us. Don't worry, I'll keep the emails anonymous!

Also, don't forget that we've got a lot of really fabulous videos (I put those together, too...) on our YouTube channel. So for those of you who are visual learners (umm...we're visual artists, right?), you may want to check them out!

If you've got questions, feel free to contact us at info@streuter.com.

Thursday, October 17, 2013

Layered Dichroic Glass Jewelry Project Sheet

To download the pdf, visit Streuter's project gallery.
  Fusing scrap bits of dichroic glass together in layers can create jewelry with depth and an aura of mystery. Use this project sheet or the accompanying video below to walk you through the process.

Approximate time to complete project = 2 hours


Monday, October 7, 2013

No Days Photo Mosaic Coaster

To download the pdf, visit Streuter's project gallery.
  This photo mosaic coaster makes a great project as a gift for a parent, grandparents, aunts, uncles and other family members. It's super easy, and if you eliminate the spacing between the pieces, you could skip the grouting to make for a quicker project. The No Days Mosaic Adhesive helps to water proof the photograph and coaster.

Approximate time to complete project = 1 to 1-1/2 hours


Wednesday, October 2, 2013

How to Make No Days Mosaic Nightlights


Tools & Materials:
  • glass base - can be a circle, square, rectangle of plate glass or stained glass (textured stained glass adds a nice look)
  • scrap glass, tiles, millefiori, etc.
  • mosaic nippers
  • circle cutting system (if you're going to cut circles, this is the easiest solution aside from buying them)
  • glass grinder
  • safety glasses
  • No Days Mosaic Adhesive
  • standard heat gun or embossing heat tool
  • long tweezers
  • night light hardware
  • sanded grout : container to mix it in, water, gloves, paper towels (You can use No Days Groutless Mosaic Adhesive to skip this step, but you may need to use a different adhesive for gluing the bail, or come up with a creative jig for holding the clip.)

Start by cutting your base piece of glass. If you want to cut circles, here are a couple of videos to help you with that...

How to cut circles using a circle cutter:


I am using plate glass in the video above. However, plate glass can be kind of brittle. If you're having a hard time, you could try using Spectrum's System 96 clear glass; it cuts like butter!

How to cut circles using a the Morton teeny tiny circle cutter:


After you've cut your glass bases, you need to make sure that the edges aren't going to bite anyone. So, get on the grinder and soften them up. Just make sure to get rid of the sharp corners. When grinding glass, you need to use water. If you're unsure of how to do this, find a local stained glass shop and they'll show you what you need to do. They can sell you a grinder or rent you one to use in the shop. If you're really lucky, they'll let you rent it for take home use, but very few shops do this!

The short video above shows my grinder set up. I've got  Mr. Splash that lives behind my grinder to prevent splashing glass dust and water from getting everywhere. I wear safety glasses while grinding, but have often had glass bits fly at my face, so to prevent that I have a sheet of 1/4" plate glass that rests across the top of my splash guard.

Now, you're ready to start building your mosaic. Start by cutting the No Days Mosaic Adhesive to the size of your glass base. Nip various bits of glass or follow a pattern and cover your glass substrate (base). When you've got it filled, you're ready to heat set the No Days Mosaic Adhesive. Make sure you're working on a heat proof surface and that you've made sure that all melt-ables are out of the way. (This includes excess adhesive!)
Using an electric skillet to heat set glass on glass mosaics.

 If you've got an electric skillet or toaster oven, you can use those to heat set the adhesive, as well. Set the temperature to 200º F (93º C) and let them cook for 10-15 minutes.  As the adhesive liquefies, some of the mosaic bits may move around. While the mosaic is still hot, use your tweezers to nudge the pieces into place. Then, let the mosaic cool while you assemble your grouting station:
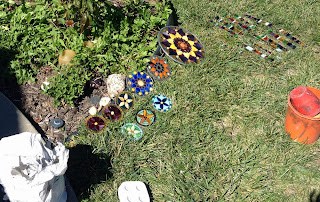
Grouting can be messy, so I like to grout outside!
Gather your grout, a mixing cup, water, and gloves. When your mosaic has cooled, it's ready to grout. Check out the video below to see the grouting process, starting at minute 4:00...


 Now, you need to glue the nightlight clip on the back of your mosaic. Cut a small length of No Days Mosaic Adhesive, about 2" x 1/4." Place the adhesive film on the back of the nightlight clip and put that on the back of your mosaic where you want it to attach.
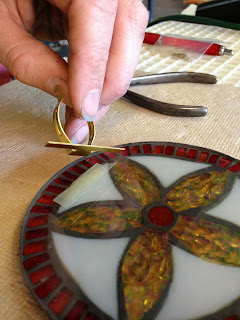
Cut a 1/4" strip of No Days Mosaic Adhesive to put under the night light clip.
Cut a 1/4" strip of No Days Mosaic Adhesive to put
under the night light clip.

Working on the heatproof surface again (I use a square homosote board. Most big box hardware stores carry this in large sizes, but some stained glass shops have this cut into smaller sizes.), turn your heat gun on and have your tweezers out to hold onto the clip while you hit it with heat. It's possible that if you heat too long, your mosaic pieces could fall out. But, I didn't have this problem. You have to heat long enough to get your glass base hot, and I stopped when the grout started to become blacker (that means the adhesive is wet). However, if you attach your clip right after grouting, you won't see this happen, because the grout is still wet.
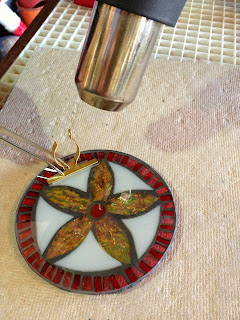
Use tweezers to hold the clip in place while heat setting the adhesive.
Use tweezers to hold the clip in place while heat
setting the adhesive.

Again, let your mosaic cool down, so the clip is firmly attached.
Screwing on the night light clip hardware.
I prefer the screw on clip for night lights because you can
really firm up the grip on the nightlight shade.
  Then put your nightlight hardware together and your night light is ready to plug in!

No Days Mosaic Nightlight by Carrie Strope Sohayda of Calyx Glass
No Days Mosaic Nightlight by Carrie Strope Sohayda