Interested in becoming a NO Days Featured Artist?

Interested in becoming a NO Days Featured Artist?


Want to share your artwork made using NO Days products with the world? We want to help you promote your work! We love seeing the various ways artists are using NO Days products! We share our Featured Artist spotlight with our newsletter subscribers, our Facebook friends and fans, on our Featured Artist Page and right here on our blog, linking back to your website.

Simply send an email to info@nodaysadhesives.com with the subject: Featured Artist. Be sure to include your name, email address, and website (if you have one) along with a brief bio and pictures of yourself and your artwork made with NO Days Products. Not sure what to include in a bio? Tell us how you became interested in playing with glass or crafts. How about where you get your inspiration? Oh! And don't forget to tell us why you love using NO Days!

Thursday, July 25, 2013

Creating 3 Dimensional Mosaics with No Days Mosaic Adhesive


NO Days Mosaic Adhesive can be used on three dimensional objects with a bit of patience and creativity.  It’s great for working on several pieces at once, as you can heat set one object and move on to the next while waiting for the adhesive to cool.

For this demonstration, we’ll be using NO Days Mosaic Adhesive with a clay pot, a glass votive, and a ceramic ornament, beginning with the clay pot...

The first thing we're going to do is use our scissors to cut a strip of adhesive off of the sheet. I usually use one strip to start out. I take my pieces and layer the pieces onto my strip. I have my wedgies holding the pot so that I have a level surface


The wedgies are nice because they’re made from a non-slip, heat resistant foam, holding your project securely, and leaving your hands free. Your local stained glass studio should be able to order them for you. Once you’ve got your first row of tiles laid, it’s time to heat set the adhesive.

We're going to heat the glass and wait for the terracotta to warm up. you'll be able to see the adhesive grab onto the terracotta, it almost seeps into the terracotta when the terracotta warms up. it kind of looks like the terracotta is getting wet under the adhesive.


NO Days Mosaic Adhesive changes from a solid to a liquid at 160 degrees Fahrenheit (71 degrees C). When the adhesive is heated, it liquifies and grabs onto the pot and the glass.  You can feel the tiles glide along the surface of the pot. If the tiles don’t glide,  then the adhesive has not been heated enough.
So we're going to heat this up a little bit more, I'm going to heat underneath it. I'm not really worried about the terracotta heating up at this point. the terracotta will not break or  thermal shock. It's porous so it grabs the adhesive nicely. The trick is to let everything to completely cool before you move on to your next row. in the past I've taken a piece of mt

Then, putting a piece of masking tape...over this to keep it from sliding so if it does soften up when your heating next row it won't slide anywhere. no were going to do our next row, and for this one I'm going to cut a little bigger piece of adhesive and we're going to put in a little larger section now that we have our first section applied.

As you’re heating the next section the tiles will begin to slide, and when they do, stop heating. Move them into place with a tool if you need, and in a few seconds they will stop sliding and begin to cool. Continue to build the rest of the way around the pot in the same manner, working on sections until you reach the first section. You can grout the pot as soon as the adhesive cools.

Using the same technique and building in strips, it’s possible to mosaic a variety of surfaces with NO Days Mosaic Adhesive...next we’re using a glass votive candle holder with glass globs...
were going to take some of our globs  and set them on mixing the colors up. were going to heat the piece up. some of the pieces of glass that you find will have thicker areas around the base...thermal shock and thick bottoms, votive is small and thin, uniform so less chance for thermal shock.

 For our next project, we’ll be building on a sphere, a small ceramic ornament. This same technique can be applied at a larger scale, for example, on a bowling ball...
place adhesive on surface, preheat to shrink the adhesive onto the surface. Place globs few at a time on the surface. heat holding gun a little higher to prevent the pieces being blow away by air you can see the adhesive melting, heating glass globs and ornaments to make sure the adhesive fully adheres, you can feel it slide a little bit when it adheres.


For more ideas and instructional videos for using NO Days Mosaic Adhesive, visit http://Streuter.com.
For ordering information or help with questions, contact: info@streuter.com.


Content:
-building a mosaic on a round surface
-tips for keeping the pieces in place
-glass on glass considerations

Monday, July 22, 2013

Q&A Monday ~ Mixed Media Techniques with Apoxie Sculpt & No Days Mosaic Mesh

Subject: Streuter Technologies: No Days Mosaic Mesh

Hi, this is my first time using your mesh, do I have to complete my project before using the heat gun or can I keep using the heat gun when I finish a section of my project before the complete mosaic is finished?

Also I want to use some beads in my mosaic can I use Apoxie Sculpt to lay my beads down in place and when the Apoxie drys use the heat gun for the surrounding stained glass?

Thank you,
Peggy Lindstrom

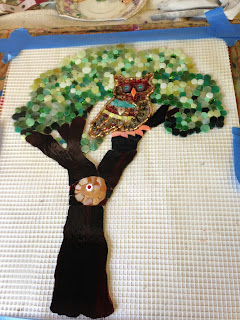
Detail of Peggy's owl on No Days Mesh with
Apoxie Sculpt holding the beads in place.

Hi, Peggy~
It's not necessary to finish the whole mosaic before heat setting sections. In fact, one mosaic artist I know likes to build cookie sheet sized sections of her mosaic, so she can put part of the mosaic in the oven to set while she works on the next section!
You do need to remember to build your mosaic on the No Days Mesh on top of the shiny side of the white release liner that comes in the package with the mesh. If you build on the non-shiny surface or forget it altogether, your mosaic and mesh will stick to the paper or surface that you're building on. After you've heat set a section, you do need to let it cool down before moving it, so that the release liner doesn't stick. The adhesive will peel off of it when it cools down, but when it's hot, it likes to stick to the liner.

The project you're working on sounds intriguing! I'd never heard of Apoxie Sculpt. I'm not sure what the makeup of the product is, but No Days Adhesive will stick to everything except silicon (the shiny side of the release liner has a silicon coating). I don't know if Apoxie will hold up to the heat gun, you may want to give them a call and ask them or make a small sample test piece. The website says that it's not flammable, but that doesn't guarantee that it won't discolor. If it doens't hold up to the heat, you could always lay down the Apoxie Sculpt and beads after heat setting the stained glass pieces.
I'd really love to see your mosaic when you've finished. I'm curious about the Apoxie Sculpt, too. I may have to think of a good reason to buy it and play with a new technique :)
I've linked to a video below from our YouTube channel specifically regarding the mesh, and also the website of the company that creates the Apoxie Sculpt and what I read about it.
Good luck!
Carrie Strope Sohayda


Work In Progress: Peggy of PalsCreations on Etsy shared
this image of her owl in a tree done on No Days Mesh.

Hi Carrie,

 Here are the pictures of the mosaic I'm working on: a tree with a little owl in the tree. I've outlined the owl with beads that I attached to the mesh with Apoxie Sculpt; it dries hard like cement and held up fine with the heat.  It's actually going to be a baby mural for one of my teammates (I belong to piecemakers, a team on etsy) who is having a baby this year. It's a collaborative effort, we are all making separate pieces and one person is going to put it all together, I'll send you a picture when its complete. My shop name is PalsCreations.etsy.com
Thanks again,
Peggy

No Days Instructor and Support
Carrie Strope Sohayda

Hi, there! Carrie, here...

Not only do I travel the country teaching folks how to use No Days adhesives (and other techniques), but I also answer customer support emails about using No Days. So, if you're having an issue with the adhesives, chances are good that I'll be answering your questions!
 
Since I get so many good questions, I thought it might be a great learning opportunity for people that may be having some of the same issues but haven't thought to email us. Don't worry, I'll keep the emails anonymous (unless you want to share pictures and take credit or share web links to your site)!  

Also, don't forget that we've got a lot of really fabulous videos (I put those together, too...) on our YouTube channel. So for those of you who are visual learners (umm...we're visual artists, right?), you may want to check them out!

If you've got questions, feel free to contact us at info@streuter.com.

Thursday, July 18, 2013

"The Art of Stained Glass" from 1938

I stumbled upon this old video of glass being made after visiting Dan Gamaldi's Cradle of the Sun website.
From the site where the video resides:
"The Art of Stained Glass. This is an old film made with the co-operation of James Powell and sons ( Whitefriars ) circa 1938. A video of this film was made a few years ago but it is no longer available. This video is not a copy but has been made from an original source. It has been made for the enjoyment of all lovers of Stained Glass . Regards Patrick "

Tuesday, July 16, 2013

No Days Stepping Stone Project Sheet

To download the pdf, visit Streuter's project gallery.
 Add some more color to your yard by making some garden art using paving stones and No Days Mosaic Adhesive. This stepping stone project doesn't take overnight to complete. If you've got access to an oven for heat setting the non-toxic adhesive, it makes the project even easier! Check out the video below for a walk through of the process...

Approximate time to complete project = 3 hours

Thursday, July 11, 2013

Playing with No Days Groutless Mosaic Adhesive

  Whenever using a new technique or new product,  I always like to start small. This gives me the chance to play around without getting too attached to the outcome and gives me an indication of whether or not my ideas will work in the selected medium. That's why I have a bunch of 1/4" mdf coaster substrates cut to four inches.
Cutting No Days Groutless Mosaic Adhesive with an exacto razor.
If you're new to using the No Days Groutless Mosaic Adhesive, I would definitely suggest a play date. Gather your tools and materials and get started:
  • coaster substrate (can be mdf or even ceramic tiles from the hardware store)
  • some trinkets, beads and glass or ceramic tiles
  • glass cutting tools (mosaic nippers, glass scorer, running pliers, safety glasses)
  • heat gun or embossing heat tool
  • scissors or craft blade
  • long heat proof tool to move the pieces around while heating (tweezers, screwdriver, craft blade, etc.)

Placing glass tiles on the coaster substrate.
After cutting the Groutless Mosaic Adhesive to the size of your coaster substrate, you can start adding tiles and bits on top. NOTE: You don't have to be exact on cutting the Groutless. It's okay if it's a little large or a little small. Also, you may want to try layering the Groutless Mosaic Adhesive in areas to see the varying effects it creates. (The Groutess Mosaic Adhesive comes in sheets that are not tacky. You can cut the sheets and stack them on top of each other before laying tiles on top of them.)
Heat the Groutless Mosaic Adhesive to set the pieces.
After you've covered the adhesive, it's time to heat set it. I call the Groutless Mosaic Adhesive a "participatory adhesive" (totally made up technical term). You really need to get in there and work with it as you're heating. As it begins to liquify, some of your pieces may start to shift and move around. It's okay, that's supposed to happen, at first! If your pieces start sliding around and things are getting out of control, then turn off the heat gun and set it aside for a moment. Glass and ceramic are insulators, so they'll hold the heat for awhile allowing you to move them into place. When the pieces are in the right spot, you need to push down on them to make the excess adhesive (causing the tiles to swim) press out from underneath the tiles and rise up around the outside edges of the tiles (to act as the grout). If the tiles stop moving, or the adhesive starts to wrinkle or ripple as you move your tiles, grab that heat gun and start heating again.
Completed sample tile in less than 30 minutes.
Once you've heated, moved and pressed on your tiles, you need to let the mosaic cool down. If you've been a good date and heated the glass or ceramic thoroughly, then it's going to take a bit longer for the mosaic to cool down. Use this time to start another sample and switch things up a bit! See how far you can push your ideas. NOTE: I forgot to mention that sometimes the Groutless Mosaic Adhesive will shrink up while you're heating, exposing the surface underneath. Don't panic! Use your tool to push on the tiles, using them to move the adhesive around and cover up any bald spots.
Create several samples tiles to create a larger mosaic of mosaics!
Once you've created tiles, try building on a glass surface. Keep it small (~4-6") and don't forget to keep your heat gun moving. Larger pieces of glass can thermal shock when heated unevenly. For more on glass on glass mosaics using Groutless Mosaic Adhesive, check out this post.

For those of you who are visual learners and need to see the process, check out the video below:

Monday, July 8, 2013

Q&A Monday ~ cracking the base of Glass On Glass mosaics

Subject: mosaic adhesive on Glass on Glass mosaics
 
After being being asked by a customer about the heat activated mosaic glue sheets, we tried them with "glass on glass" using the GNA restover restoration glass & glass tiles.  These were heated both by the heat gun & your "patented heater" & both resulted in moderate to poor adhesion with the back glass being cracked all 3 times.....  We've gone back to using the old standard "Weldbond".  Neither of these were more than 2 ft sq in surface area.  Is this a common thing?  I am reluctant to push this product after my bad luck, any suggestions?
 P


14" round Glass on Glass (GOG) mosaic created with stained glass on recycled window glass
with No Days Groutless Mosaic Adhesive. The edge of the glass base was wrapped with
zinc edge came and soldered together with wire hangers.


Hi, P~
 I'm sorry to hear that you're having problems with the adhesive on glass on glass (GOG) mosaics. Since it is a heat set adhesive, using the adhesive on larger sheets of glass can result in cracking with uneven heating. Glass can thermal shock and crack if different parts of the window are heated too quickly. I've attached a photo of one of the GOG mosaics that I've been working on lately. These are 14" round on plate glass (recycled window panes). To heat these, I bring the whole thing up to temperature in the kiln or oven before heating with a heat gun. This ensures that the glass is all the same temperature and evenly heated. In the oven, I'll set the temperature to 200 degrees and put the piece in while the oven is room temp. 10-15 minutes later, I can remove it to an insulated work surface (I use homosote board) and continue to heat with a heat gun to move my pieces into place and push down on them to ensure good contact with the plate glass below. (In the kiln, I set the temp a bit higher so I don't have to wait so long. The kiln shelves steal a lot of the heat away from the glass.)
I'm curious to know if the curing station that you're using is as big as the glass you're building on. If it is, you shouldn't be having problems. However, if it doesn't cover the whole piece of glass, then I could see it thermal shocking. Also, what kind of surface are you heating on?
I've linked to the following blog post in hopes of addressing your other issue of poor adhesion. If the pieces of glass that you're working with have lots of texture, then there may be few points of adhesion. The surface area of the pieces that are actually adhered may be too small. Also, if the base piece of glass doesn't reach 160ºF (70ºC), then that would result in pop-offs, as well.

Do you happen to have any pictures of the failures/cracked glass?
Does this help to answer any of your questions or make sense?
Let me know if it doesn't make sense.
Carrie Strope Sohayda


No Days Instructor and Support
Carrie Strope Sohayda

Hi, there! Carrie, here...

Not only do I travel the country teaching folks how to use No Days adhesives (and other techniques), but I also answer customer support emails about using No Days. So, if you're having an issue with the adhesives, chances are good that I'll be answering your questions!
Since I get so many good questions, I thought it might be a great learning opportunity for people that may be having some of the same issues but haven't thought to email us. Don't worry, I'll keep the emails anonymous!

Also, don't forget that we've got a lot of really fabulous videos (I put those together, too...) on our YouTube channel. So for those of you who are visual learners (umm...we're visual artists, right?), you may want to check them out!

If you've got questions, feel free to contact us at info@streuter.com.